سلام خوبید؟بعد عمری میخوام آموزش بزارم چون تاحالا نزاشتم :دی
زبانش اینگیلیسی هست چون حوصله نداشتم ترجمه کنم.تصاویر هم کاملا گویا هست.اگه نفهمیدی بمیر :| 
خب اینم آموزش=
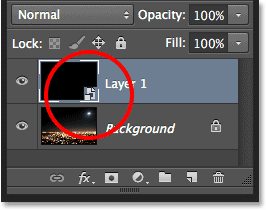
Smart Objects are indicated by a small icon in their preview thumbnail.
Step 4: Apply The Add Noise Filter
We\'re ready to add our filters, and we\'ll start with the Add Noise filter. Go up to the Filter menu at the top of the screen, choose Noise, then choose Add Noise:
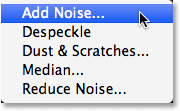
Going to Filter > Noise > Add Noise.
This opens the Add Noise dialog box. The Add Noise filter
basically adds a bunch of little white, single-pixel dots to the
black-filled layer, and we control how many dots are added using the Amount value. Enter a value of around 25%. At the bottom of the dialog box, set the Distribution option to Gaussian and select the Monochromatic option, which will prevent any colors other than black and white from appearing in the noise:
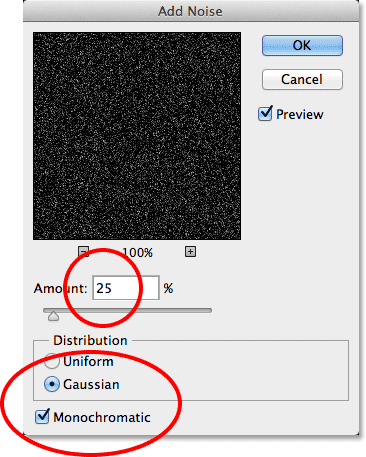
The Add Noise dialog box.
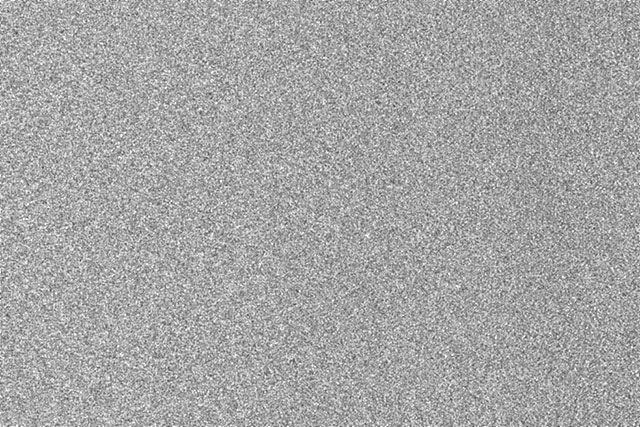
Click OK to close out of the Add Noise dialog box. Photoshop fills the layer with noise (random dots):
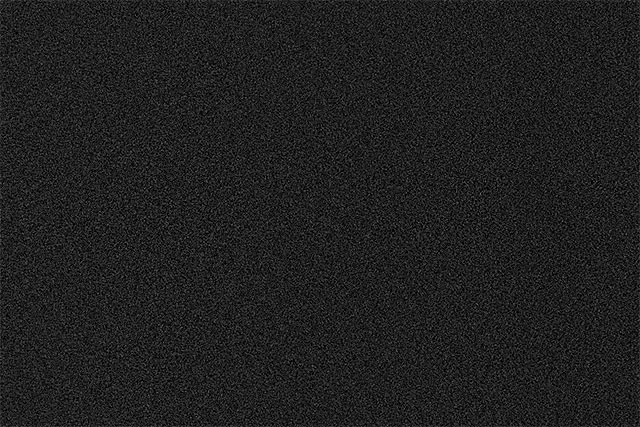
The image after applying the Add Noise filter.
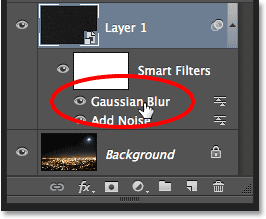
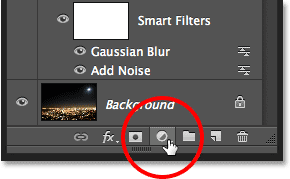
If we look back in the Layers panel, we see the Add Noise filter listed as a Smart Filter below Layer 1:
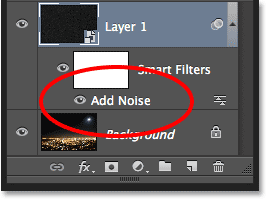
The Layers panel showing the Add Noise Smart Filter.
Step 5: Apply The Gaussian Blur Filter
Now that we\'ve added some noise, we need to add a bit of
blurring to it, which will make those single-pixel dots a bit wider and
clump some of them together. We\'ll do that using Photoshop\'s Gaussian
Blur filter. Go back up to the Filter menu, choose Blur, then choose Gaussian Blur:
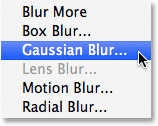
Going to Filter > Blur > Gaussian Blur.
This opens the Gaussian Blur dialog box. We control the amount of blurring using the Radius
value, and you can either enter a value directly into the Radius box or
drag the slider along the bottom to increase or decrease the value. The
value you\'ll want to enter here will depend on the size of your image.
Generally, a Radius value of 2 to 6 pixels works best, with 2 pixels
being ideal for small images and 6 pixels for very large images.
The nice thing is, since we\'re adding the Gaussian Blur
filter as a Smart Filter, we can easily go back later and try a
different value. I\'m going to enter a Radius value of 3 pixels:
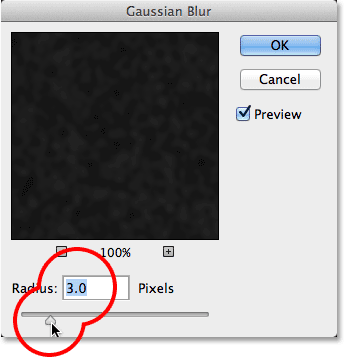
Setting the Radius value to 3 pixels.
Click OK when you\'re done to close out of the dialog box and
apply the blurring effect to the noise. If we look again in the Layers
panel, we see both the Add Noise and Gaussian Blur filters listed as
Smart Filters below Layer 1:
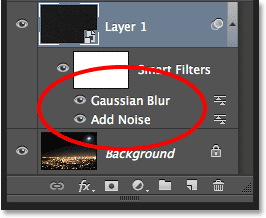
Both filters are now listed as Smart Filters.
If you decide later on that you want to try a different Radius value for the Gaussian Blur filter, all you\'ll need to do is double-click directly on the words Gaussian Blur:
Double-clicking on the Gaussian Blur Smart Filter.
This will re-open the filter\'s dialog box where you can enter
in a different Radius value, again anywhere from 2 to 6 pixels
depending on the size of your image. Simply click OK when you\'re done to
close back out of the dialog box. You can do this as often as you like
because Smart Filters in Photoshop are non-destructive, meaning
no permanent changes are ever made to the image. Using Smart Filters
with our effects make it easy to fine-tune them and get them looking
just right.
Step 6: Add A Levels Adjustment Layer
Next, we need to brighten the lightest areas of our noise
layer and darken the darkest areas. This will turn the faint, blurry
noise into our stars. Press and hold the Alt (Win) / Option (Mac) key on your keyboard and click on the New Adjustment Layer icon at the bottom of the Layers panel:
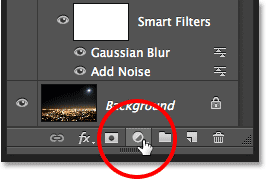
Clicking the New Adjustment Layer icon while pressing and holding Alt (Win) / Option (Mac).
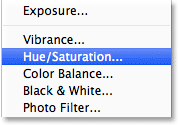
Choose a Levels adjustment layer from the menu that appears:
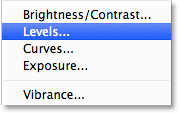
Choosing a Levels adjustment layer.
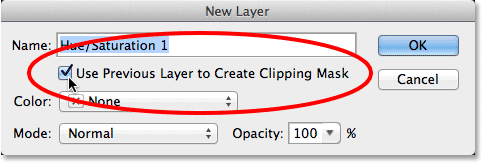
Photoshop will pop open the New Layer dialog box. Select the Use Previous Layer to Create Clipping Mask option by clicking inside its checkbox. This will clip
our adjustment layer to the noise layer below it, meaning that anything
we do with the Levels adjustment layer will affect only the noise
layer. The original image on the Background layer will not be affected.
Click OK when you\'re done to close out of the dialog box:
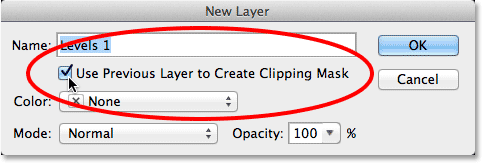
Checking the Use Previous Layer to Create Clipping Mask option.
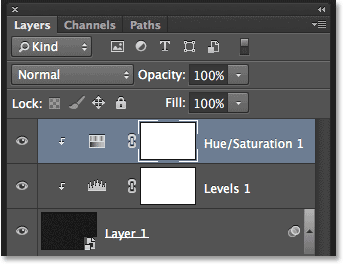
Photoshop adds the new Levels adjustment layer, named Levels 1,
above the noise layer. It appears indented to the right with a small
arrow pointing down at the layer below it. This tells us the adjustment
layer is clipped to the noise layer:
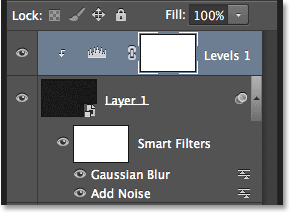
The Levels adjustment layer (Levels 1) is added above Layer 1.
Learn how clipping masks work in Photoshop
Step 7: Adjust The White And Black Point Sliders
The controls and options for the Levels adjustment layer appear in the Properties panel. In the center of the panel is the Histogram,
a graph showing us the current tonal range of the image (or in this
case, the tonal range of the noise layer). Directly below the histogram
are three little sliders. The one on the far left, filled with black, is
the black point slider. The one on the far right, filled with white, is the white point slider. There\'s also a gray slider in the middle, but for this effect, we won\'t need to use it:
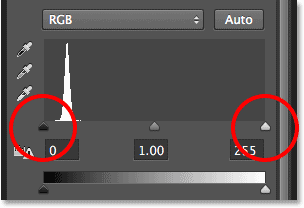
The black point (left) and white point (right) sliders.
Click on the white point slider on the right
and begin dragging it towards the left. As you drag, you\'ll see the
lighter areas of the noise becoming brighter. Drag the slider all the
way over to where the right side of the histogram begins. This will
brighten the lightest areas of noise to pure white:

Dragging the white point slider to the right side of the histogram.
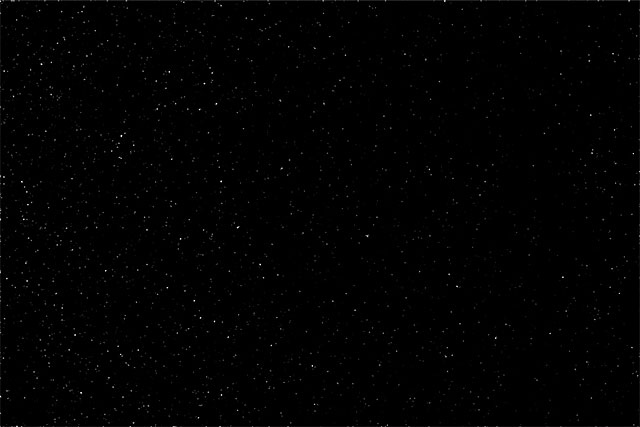
Here\'s what my image looks like after dragging the white point slider to the left:
The lightest areas of noise are now much brighter.
Next, click on the black point slider on the
left and begin dragging it towards the right. As you drag, you\'ll see
the darkest areas of noise becoming pure black. As you drag the slider
further, more and more of the noise will disappear into the darkness.
You\'ll need to drag the black point slider very close to the white point
slider to achieve the best results, and you\'ll probably want to play
around with both sliders a bit to fine-tune the effect:

Dragging the black point slider to the right.
Here\'s my stars effect after dragging the black point slider.
One important note is that if you\'re creating the effect for print,
you\'ll want to adjust the white and black point sliders so that it looks
like you actually have more stars than you need, and that\'s because
you\'ll lose some of the effect during the print process. If you\'re
creating the effect strictly for the screen, you won\'t need to worry it:
The effect after adjusting the black point slider.
I mentioned earlier that you can go back at any point and
re-adjust the amount of blurring being applied to the noise layer by
double-clicking on the Gaussian Blur Smart Filter in the Layers panel
(see Step 5). You can also go back and re-adjust these white point and
black point sliders. Simply click on the Levels adjustment layer in the
Layers panel to make it the active layer (if it isn\'t active already),
then drag the sliders in the Properties panel. Just like Smart Filters,
adjustment layers in Photoshop are non-destructive and fully editable.
No permanent changes are made to the image.
Download our tutorials as print-ready PDFs! Learning Photoshop has never been easier!
Step 8: Add A Hue/Saturation Adjustment Layer
Let\'s add a bit of color to the stars, and we can do that
using a Hue/Saturation adjustment layer. Once again press and hold your Alt (Win) / Option (Mac) key on your keyboard, then click on the New Adjustment Layer icon at the bottom of the Layers panel:
Clicking again on the New Adjustment Layer icon while holding Alt (Win) / Option (Mac).
Select a Hue/Saturation adjustment layer from the list that appears:
Choosing Hue/Saturation from the menu.
Photoshop will again pop open the New Layer dialog box. Just as we did before, select the Use Previous Layer to Create Clipping Mask option by clicking inside its checkbox:
Selecting the Use Previous Layer to Create Clipping Mask option.
Click OK when you\'re done to close out of the dialog box. Photoshop adds a new Hue/Saturation adjustment layer named Hue/Saturation 1
above the Levels layer (I\'ve expanded the width of the Layers panel in
the screenshot just to make the name visible). This new adjustment layer
is also clipped to the noise layer, allowing us to colorize only the
noise, not the original image:
The Layers panel showing the new Hue/Saturation adjustment layer.
With the Hue/Saturation adjustment layer active in the Layers panel, the Properties panel changes to the Hue/Saturation controls and options. First, select the Colorize option near the bottom of the dialog box by clicking inside its checkbox. Then, drag the Hue
slider to select whichever color you like for your stars. I think blue
looks nice, so I\'ll drag my Hue slider over to the right to a value of
around 212. If you think the color looks too intense, drag the Saturation slider towards the left to reduce it. I\'ll lower my Saturation value from its default value of 25 down to 15:
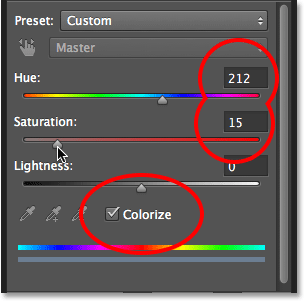
Checking Colorize, then dragging the Hue and Saturation sliders.
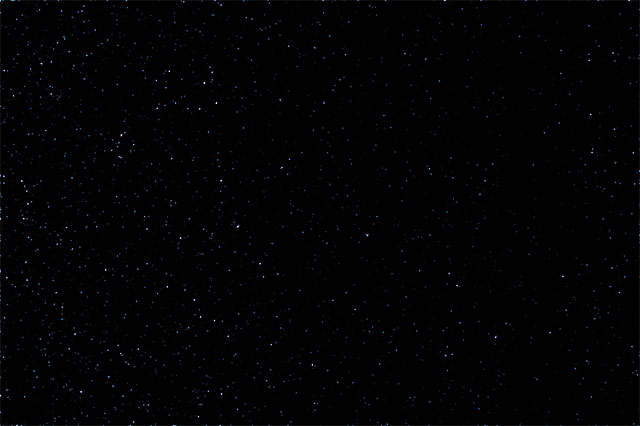
Here\'s my image after colorizing the stars. The colorizing
effect is quite subtle so it may be easier to see the result with your
own image in Photoshop than it is in this screenshot:


 کلیک کنید !


