
Pre-Sales Questions
It's one time cost. You can use your purchased version of Booking Calendar as long as you need on your website.
Also, you can request free updates your version of Booking Calendar (if such updates ready) during 6 months after purchase of plugin. You can request new update of Booking Calendar on this page.
If you will need to extend period (of support and getting free updates) to the next 6 months, it will cost 50% from the original cost.
If you are having questions about configuration of plugin you can contact by this email support @ wpbookingcalendar.com or through the support forum https://wpbookingcalendar.com/support/
Please note you will get response during 24 hours, usually we are response during 2-3 hours during working hours ( 10:00 - 19:00 UTC+2). If you do not see response, please check your SPAM folder, or recheck that you was contact from the valid email (if you was used contact form https://wpbookingcalendar.com/contact/ ).
Please note, we can help with specific questions about configuration or troubleshooting. But we do not provide full configuration at customer website and do not provide any customization of source code, etc...
You can get support and ability to request free updates during 6 months after purchase. After this person if you will need to get updates for next 6 months or getting support it’s will cost 50% forms original Booking Calendar cost.
Please watch more useful video guides here https://wpbookingcalendar.com/help/
You can request free updates your version of Booking Calendar (if such updates ready) during 6 months after purchase of plugin. You can request new update of Booking Calendar on this page.
If you will need to extend period (of support and getting free updates) to the next 6 months, it will cost 50% from the original cost.
Each specific version of Booking Calendar can be single site usage version, developer or multi site usage version.
Single site usage version, possible to install and activate only at 1 specific website.
Developer edition version, possible to install and activate at 2 different websites. Its can be test (developer) server and live website.
Multi site usage version, possible to install and activate maximum on 5 different websites.
You can check overview of different Booking Calendar versions.
You can also check all available features for different versions of Booking Calendar.
Also you can test live demo of specific versions (both client and admin sides) to be sure in functionality and do not have misunderstanding.
Booking Calendar "Free" - this version is free, you can download it from WordPress directory.
It's very easy in use and powerful version for the creating reservation of one resource.
At this version is possible to make reservation for the one resource, like a room or car, or some service... etc. You can insert into the post or page the standard booking form with fixed number of fields and availability calendar, where visitor can select single or multiple days. Administrator and visitor can receive the standard email notifications about different actions, like a "new booking", "approve/decline/... of booking", etc... Administrator can make the booking at admin panel at the "Add new booking" menu page and configure the different settings of the booking form and availability calendar at the general booking settings menu page.
Booking Calendar Personal - it's paid version, where is possible to have booking availability calendar for the each of multiple booking resources (like a room, cars or any services, etc…). You can add new and configure exist fields in the booking form. Also you can configure the email templates for the different booking actions. You can able to edit the exist bookings, add comments to the bookings, print and export bookings to the CSV format, etc… Please check at the feature list and live demo of this version, full list of features of this version.
Booking Calendar Business Small - it's paid version, where is possible all actions from previous versions, plus you can receive the bookings for the specific time of date, set the cost of booking resource and integrate the online payment form of supported payment systems. Your visitors can make the rage days selection using the one mouse click in calendar, or setting minimum or sets of fixed number of days selection using 2 mouse clicks (check in and checkout dates), all middle dates will be selected automatically. Also here is possible to use the same date as check in/out date for the different bookings by activating the fixed time at the settings page.
Please note, if you will use the fixed time slot list selection (and not the time entering using the text fields) in the booking form, the timeslot list will be the same for the any date of week, in other words the fixed time slot list is not depend from the week of day. Also if some visitor will reserve the specific time slot at selected date at specific booking resource (calendar), this timeslot become unavailable for the other visitors at this selected date in this booking resource.
And much more... Please check at the feature list and live demo of this version, full list of features of this version.
Booking Calendar Business Medium - it's paid version, where is possible all actions from previous versions, plus you will have more advanced cost and availability management of the bookings. At this version is possible to set the rates, which will depend from the season filters, plus you can set the more advanced cost for the booking, where cost is depend from the number of selected dates. Also you can set additional cost for the option selection at selectboxes or checkboxes at your booking form. this additional cost can be fixed sum or percent from the final cost of booking. You can even activate and configure for the resources the deposit payment feature, what is mean that visitor will pay at the payment form, the part of the final cost of the booking. This version is also support settings availability per each booking resource, which is depend from the season filters. Also you can able to configure the several customization of booking form fields, it's mean that different resources can have different form fields. You can send the payment requests to visitors for the specific booking by email. And much more.... Please check at the feature list and live demo of this version, full list of features of this version.
Booking Calendar Business Large - it's paid version, where is possible all actions from previous versions, plus you can make the several reservations per the same FULL date (not a time slot) for the same booking resource (availability calendar). At this version is possible to set the capacity of the booking resource, it's mean that your visitors can make the several reservations per the same date, in other words, the date(s) in calendar will be available until lumber of reservations per these full dates is less than capacity of the booking resource. Please note, if you will use the timeslot selection for the booking resource with capacity higher than one, so then this timeslot will be simply record as a data into DB according this booking, but will not impact to the time availability. Also at this version you will be able to search the available booking resources in your pages or posts for the specific check in/out dates and specific number of visitors. This version is also support the coupon codes for getting discounts of bookings. And much more.... Please check at the feature list and live demo of this version, full list of features of this version.
Booking Calendar MultiUser - it's paid version, where is possible all actions from previous versions, plus each registered WordPress user of your site can have independent, individual, own booking admin panel. It's mean that each regular registered WordPress user can see only OWN booking resources and bookings and can configure the own booking form fields and email templates, own payment form integration data and costs of booking resources as some other settings... In this version is exist also the "super booking admin users", which can see and manage the bookings and booking resources from the all users and manage the status of other bookings users. And much more.... Please check at the feature list and live demo of this version, full list of features of this version.
Unfortunately we can not make personal customization or custom development on customer demand. But we can add features, that you need to our TODO list for implementing them in a future updates. You can add your request of specific feature at this page.
Please note, we can not specify some approximate time for implementation of the specific feature but we will make the best to implement specific feature ASAP.
Yes, its possible to make upgrade from lower version to the higher versions of the same editions (for example from the Booking Calendar Personal single site usage version to the Booking Calendar Business Small single site usage version).
But its does not possible to make upgrade from the single site usage version to the "developer" or multi site usage versions or from the "developer" to the multi site usage versions.
The cost of upgrade from the lower to higher versions, usually higher than difference in cost between 2 versions.
The cost of upgrade from the lower to higher versions of single site usage versions higher on $20 than difference in cost between 2 versions.
The cost of upgrade from the lower to higher versions of "developer" edition versions higher on $30 than difference in cost between 2 versions.
The cost of upgrade from the lower to higher versions of multi site usage versions higher on $50 than difference in cost between 2 versions.
Installation / Update / Upgrade
Using the WordPress Plugins menu page.
1) Open the WordPress Plugins menu, select "Add new plugin" submenu
2) In the search text field enter "booking" or "booking calendar" term and select search.
In the search results, find "Booking Calendar" (created by wpdevelop) plugin and click on "Install" link. Wait until the plugin is downloaded and installed.
3) Open the WordPress Plugins menu page and click on "Activate".
Wait for the message "Plugin is activated successfully". This is important. Otherwise not all DB tables will be created and you will have an error message.
The plugin is now ready for use.
Installation using the uploading of plugin zip archive.
1) Open the WordPress Plugins menu page, select the "Add New" plugin sub-menu and then click on "Upload Plugin" button at top of page. Click on the "Choose File" button and select the booking zip archive. Click on "Install Now" button and wait for the plugin to be uploaded.
If you will receive message like this: "The uploaded file exceeds the upload_max_filesize directive in php.ini", then please check this troubleshooting instruction.
If you want to upload the booking zip archive via FTP, then you need to extract the archive content. You have to get at result the booking folder with plugins files. Then upload entire this folder to ../wp-content/plugins/ folder at your server.
2) Now open the WordPress Plugins menu page and "Activate" that plugin.
Wait for the message "Plugin is activated successfully".
The plugin is now ready for use.
1) Open the WordPress Plugins menu page at your admin panel of your site. You have to see at the bottom of the Booking Calendar the line about he new version is available.
2) Click on update link and wait until the plugin is downloaded, installed and reactivated.
3) You are need to wait until the message will show that the plugins is reactivated successfully. It's important.
4) If you are by some reason will get the some error messages, please make the reactivation process:
- open firstly the General Booking Settings menu page, and at the right side of the page recheck that this option "Delete booking data during uninstall" is turned Off (unchecked), otherwise all your booking data during deactivation will be deleted;
- open the WordPress Plugins menu page and click on "Deactivate" link of Booking Calendar. Wait for the message "Plugin is deactivated successfully". It's important.
- open the WordPress Plugins menu page and click on "Activate" link of Booking Calendar. Wait for the message "Plugin is Activated successfully". It's important.
Please clear the browser cache, because update can have a new updated CSS or JS files.
Now you can use your updated version.
1) If you are use the paid version of Booking Calendar, do not make update from the WordPress directory, otherwise you will get the free version.
2) You can check if the new version is available and what changes or new features in the new version at this page
3) You can request the free updates, of your purchased version (if the updates are ready) during one year, after purchase of your version. After this period, if you want to prolong the getting updates for the next 6 months, it's will cost the 50% from the original cost of your version of Booking Calendar. You can request the new update of Booking Calendar on this page.
4) Update process.
After you have received the archive with updated version of plugin, follow these steps:
Tip We recommend to make backup of your DataBase and Booking Calendar folder, before making backup, in this case, you will be able to rollback to previous versions and data in any time.
Tip Please note, during update process all plugin files are replacing to new. Its means that if you have edited any source files of plugin (in plugin folder), then you will be need to make this customization again after plugin update
- Open General Booking Settings menu page of Booking Calendar admin panel, and at the right side of the page recheck that this option "Delete booking data during uninstall" is turned Off (unchecked), otherwise all your booking data and settings options during deactivation will be deleted;
- Open the WordPress Plugins menu page and click on "Deactivate" link of Booking Calendar. Wait for the message "Plugin is deactivated successfully".
- Click on "Delete" link under Booking calendar and wait until the plugin is deleted.
- Open WordPress Plugins menu page, then select the "Add New" plugin sub menu and then click on "Upload Plugin" button at top of page. Click on browse button in upload form and select the booking zip archive, which you have received. Click on upload button and wait until the plugin is uploaded.
If you will receive message like this: "The uploaded file exceeds the upload_max_filesize directive in php.ini", then please check this troubleshooting instruction.
If you want to upload the booking zip archive via FTP, then you need to extract the archive content. You have to get at result the booking folder with plugins files. Then upload entire this folder to ../wp-content/plugins/ folder at your server. - Open WordPress Plugins menu page and click on "Activate" link under new Booking Calendar plugin version.
Wait for the message "Plugin is activated successfully".
Please clear the browser cache, before using new update.
1) When you made the purchase upgrade of Booking Calendar paid version, you have to receive the link for downloading the paid version of Booking Calendar. Please download this archive.
After you have received the archive with updated version of plugin, follow these steps:
Tip We recommend to make backup of your DataBase and Booking Calendar folder, before making backup, in this case, you will be able to rollback to previous versions and data in any time.
Tip Please note, during update process all plugin files are replacing to new. Its means that if you have edited any source files of plugin (in plugin folder), then you will be need to make this customization again after plugin update
2) Open General Booking Settings menu page of Booking Calendar admin panel, and at the right side of the page, recheck that this option: "Delete booking data during uninstall" is turned Off (unchecked), otherwise all your booking data during deactivation will be deleted.
3) Open the WordPress Plugins menu page and click on "Deactivate" link of Booking Calendar (your previous version). Wait for the message "Plugin is deactivated successfully".
4) Click on "Delete" link of Booking calendar and wait until the plugin is deleted.
5) Open WordPress Plugins menu page, then select the "Add New" plugin sub menu and then click on "Upload Plugin" button at top of page. Click on browse button in upload form and select the booking zip archive, which you have received. Click on upload button and wait until the plugin is uploaded.
If you will receive message like this: "The uploaded file exceeds the upload_max_filesize directive in php.ini", then please check this troubleshooting instruction.
If you want to upload the booking zip archive via FTP, then you need to extract the archive content. You have to get at result the booking folder with plugins files. Then upload entire this folder to ../wp-content/plugins/ folder at your server.
6) Open the WordPress Plugins menu page and click on "Activate" link.
Wait for the message "Plugin is activated successfully".
Please clear the browser cache, before using new update.
1) When you made the purchase of Booking Calendar paid version, you have to receive the link for downloading the paid version of Booking Calendar. Please download this archive.
After you have received the archive with updated version of plugin, follow these steps:
Tip We recommend to make backup of your DataBase and Booking Calendar folder, before making backup, in this case, you will be able to rollback to previous versions and data in any time.
Tip Please note, during update process all plugin files are replacing to new. Its means that if you have edited any source files of plugin (in plugin folder), then you will be need to make this customization again after plugin update
2) Open the General Booking Settings menu page of Booking Calendar admin panel, and at the right side of the page recheck that this option "Delete booking data during uninstall" is turned Off (unchecked), otherwise all your booking data during deactivation will be deleted.
3) Open the WordPress Plugins menu page and click on "Deactivate" link of Booking Calendar (free version). Wait for the message "Plugin is deactivated successfully". It's important.
4) Click on "Delete" link of Booking calendar and wait until the plugin is deleted.
5) Open WordPress Plugins menu page, then select the "Add New" plugin sub menu and then click on "Upload Plugin" button at top of page. Click on browse button in upload form and select the booking zip archive, which you have received. Click on upload button and wait until the plugin is uploaded.
If you will receive message like this: "The uploaded file exceeds the upload_max_filesize directive in php.ini", then please check this troubleshooting instruction.
If you want to upload the booking zip archive via FTP, then you need to extract the archive content. You have to get at result the booking folder with plugins files. Then upload entire this folder to ../wp-content/plugins/ folder at your server.
6) Open the WordPress Plugins menu page and click on "Activate" link.
Wait for the message "Plugin is activated successfully".
Please clear the browser cache, before using new update.
What's Next?
Please read the general instruction about usage of paid versions of Booking Calendar.
You can create the different booking resources, unique calendars - your properties or services at the Booking > Resources page. And then you be able to insert booking shortcode (booking form or availability calendar) for for specific booking resource (your properties or service) into the post or page.
Please read more how easily insert booking form or availability calendar into a pages or how manually configure Booking Calendar shortcodes in content of your pages.
Please note, you can request the new update of Booking Calendar on this page.
A) Probably at your computer was set properties for the archive files to show as folder and that's why you see it as a folder.
Please check in your explorer to show the extension of the files. Then try to download it again and make upload to your website.
Check more helpful info here or here.
B) Or you can upload entire folder (not zip file) to your serve by FTP (skip 2 first points) :
1) Please download the archive of the Booking Calendar to your desktop.
2) Extract it from archive. You have to get the "booking" folder.
3) Please upload this folder, using the FTP manager to your server, to the folder ../wp-content/plugins/
If you do not have access to your server through FTP, then please contact support of your hosting company about this details.
4) Now open admin panel of your WordPress site at the Plugins menu, you have to see there Booking Calendar plugin. (If you was having previous free version, there, please deactivate it).
Please click at the "Activate" link of your new paid version.5) Please wait until message will show that the plugin is activated successfully.
Now you have to be able to use Booking Calendar plugin.
Using Booking Calendar
After activation of plugin, you are almost ready to use it.
Inserting the booking form into post or page (widget or any other place of your site)
Just open the edit post or edit page menu page or add new page or post and inside of the edit content toolbar click on Booking Calendar button (button with calendar icon). Inside of the configuration popup dialog configure the options, like number of visible month of calendar, inserting the booking form with calendar or just availability calendar (paid versions in additional will have possibility to select the specific booking resource, for having different booking availability calendars; in some versions also possible to select the custom booking form, or inserting the search form) and insert the booking shortcode into the content of post or page. Publish or update the post or page, open it at client side of site and you will be able to see and make bookings in the booking form.
You can also show the booking form or availability calendar using the booking calendar widget at your sidebar. So please open the WordPress widget menu page and configure the booking calendar widget.
It's possible to integrate the booking calendar form into the any other place of your site, using the special PHP code, please read more detail about this at the FAQ.
Checking new bookings.
After your visitors are made the booking at your site, you will receive the email about the new booking to the email, which you are set at the General booking settings page. You can check the booking at the "Booking listing" page of your WordPress admin panel. Each booking consist information about the dates of reservation data from booking form fields, ID of booking, date of booking creation, booking status, like approved or pending booking.
At the top of this page you can use the booking filter tab to show the bookings, which are fit to parameters of the booking filter.
Changing status of bookings (approve/decline/set pending/set as read).
You can approve, delete, set pending status, or mark as read for the single booking using the buttons at the right side of each booking at the "Booking Listing" page (mark the single booking as read, you can make by clicking on the "new" label at the left side of booking.
The same actions you can make at the multiple bookings, if you are select the multiple bookings, by setting checked the checkboxes at left side near each booking and using the specific button at the top of the page at "Actions tab".
Adding new booking.
You can add a new booking at the client side of site, as a regular visitor of your site, where you are inserted the booking form.
You can also add new booking at the admin panel at the "Add new booking" menu page. At this page you will see the same booking form as at client side.
Settings configuration of booking calendar.
You can configure the different settings of availability calendar, booking form or plugin options at the general booking settings page.
"Admin email" - default admin email for notifications about new bookings and other actions in a booking system.
"Show hints" - show / hide help hints, at the admin panel.
Expanded advanced settings of JavaScript loading
"Dissable Bootstrap loading at Client side" - if your theme or some other plugin is load the BootStrap JavaScripts, you can dissable loading of this bootstrap script by this plugin. Please do not activate this feature, if no any other plugin or theme is not loaded these scripts, otherwise can be some issues (issue - warning message about not selected days in calendar during reservation process, even if the dates are selected).
"Dissable Bootstrap loading at Admin side" - if your theme or some other plugin is load the BootStrap JavaScripts, you can dissable loading of this script by this plugin. Please do not activate this feature, if no any other plugin or theme is not loaded these scripts, otherwise can be some issues.
Expanded settings of powered by notice
"Powered by notice" - turn On/Off powered by "Booking Calendar" notice under the calendar in booking form.
"Copyright notice" - turn On/Off copyright notice at footer of site view.
"Calendar skin" - select the skin of booking calendar
"Number of months" - select your maximum number of scroll months at booking calendar. It's number of months, which you can scroll in calendar using the scroll month arrow in a header of calendar.
"Start Day of week" - select your start day of the week in calendar.
"Multiple days selection" - Activate or disable possibility to select single or multiple days in calendar. If you will leave this option unchecked so you will be able to select only one date in calendar.
"Unavailable days from today" - select number of unavailable days in calendar starting from today date. It's useful if you can not accept bookings for today or today and tomorrow days, etc...
"Unavailable days" - set the specific week days (Sunday / Monday / Tuesday / Wednesday / Thursday / Friday / Saturday) as unavailable days in calendars. This option is overwrite all other settings.
"CAPTCHA" - activate CAPTCHA inside of booking form.
Auto fill fields" - activate auto fill fields of booking form for logged in users.
"Show legend" - hide or show legend of dates under booking calendar.
"Show "thank you" message after booking is done" - activating showing of the message for the specific time, after visitor is made the reservation.
"New booking title" - mesaage what is showed after booking has done by visitor.
You can use this shortcode inside of that message: [lang=LOCALE] - start new translation section, where LOCALE - locale of translation
Example #1: [lang=fr_FR] - start French tranlation section.
Example #2: "Thank you for your booking.[lang=fr_FR]Je vous remercie de votre reservation." - English and French translation of some message.
"Showing title time" - time count in miliseconds for showing "new booking title"
"Redirect visitor to a new "thank you" page" - instead of showing message for specific time, the visitor will be redirected to a new page, after he will made the reservation, if this option is activated.
"URL of "thank you" page" - URL of "thank you" page.
"Bookings number per page" - select number of bookings per page in booking listing
"Bookings default order" - select your default order of bookings in the booking listing
"Default toolbar tab" - select your default opened tab in toolbar at booking listing page
"Date Format" - set your dates format, like "June 10, 2012" or "2012/06/10" or "06/10/2012" or "10/06/2012" or custom format (please check more info at documentation on date formatting). This date format is apply to the dates in emails and booking listing table.
"Dates view" - select default type of dates view at the booking tables. You can select sowing of all dates, or showing only check in and check out dates for the each reservation at the booking listing page and inside of email templates.
"Bookings Calendar menu pages" - select the minimum user access role to access for the specific page of admin booking panel.
"Delete booking data" - activate this option if you want to completly delete booking data during deactivation of plugin.
1) You need to create the booking resources for the each of your properties or services on the Booking > Resources page.
You can read more info about the booking resources and how to configure them on this page.
2) Then you be able to insert the booking form for the specific resource (your property or service, which need to be booked) into the any posts or pages. You can check how to insert and configure booking shortcode into the posts or pages here. Also check how manually to configure Booking Calendar shortcodes here.
3) Finally you can reconfigure settings, form fields and email templates, if you need the different options, on the Booking > Settings pages.
The Booking Calendar MultiUser version have 2 types of the users: super booking admin and usual user.
The "first" WordPress admin user by default is "super booking admin" user.
So, firstly after activation of the plugin you have to see the booking panel for that user.
Then you are need to open the "general booking settings" page (this page is available only for the super booking admin users), then expand the User settings section at the right side and set the correct permissions (user roles) for the pages of the booking admin panel. Its required for the new WordPress users possibility to open the admin booking admin panel.
Now, you can create new WordPress user (the role of this user have to be higher or equal to the roles, which you are set at the previous step).
Now, you are need to open the Booking > Settings > Users page (you are have to be logged in as booking super admin user) and make activation of the booking admin panel for the new WordPress user.
Finally, you can log in as new WordPress user, and you will see own booking admin panel for this user. You can create new booking resource(s), configure the settings and insert the booking form(s) of this user into posts or pages, which is created by this user.
Workflow of configuration for do not have access of "Regular users" to Settings page and having unique configuration of booking form / Emails / Payments, as needed from view of super booking admin user.
So in case if you need to configure booking form field for regular user, and after this configuration block access to the settings field, you need to make following steps:
1) Please log in as "super booking admin user". I can suggest that this user have WordPress "Administrator" user role.
2) Open the Booking > Settings General page and set access level to "Settings" page as "Contributor" (or administrator).
3) Create new WordPress User (via standard WordPress admin panel), and set user role for this user as "Contributor" (or other user role, which you was set at point #2)
4) Open the Booking > Settings > Users page and activate booking admin panel for this new user as for "Regular user".
5) Now log in to WordPress admin panel as this specific "Regular user". Configure booking form fields and emails, and all other settings from Booking > Settings menu.
6) Log out and log in as "Super booking admin user". Now change "user role" for this regular user from "Contributor" to "Subscriber".
Now you can inform login and password of "Regular user" to real person.Now if this user will log in into the booking admin panel (WordPress admin panel), he/she will not have access to the Booking > Settings page, and will have booking form as you was configured previously.
Booking Calendar it's WordPress plugin, which make possible to make bookings of any properties or services at your site by visitors. Your visitors can select a date(s) in a calendar, fill the booking form and make a booking. The booking data will be storied in DB of your site and you can check and manage it (approve/decline/delete/... etc. ) at booking admin panel at your site, the email notifications about those actions can be sent to the administrator and to visitor emails.
You can insert the booking form with availability calendar into any post or page of your site or configure and activate the booking widget for your site sideboard.
The booking admin panel is consist from several pages:
"Booking Listing" - at this page you can view and filter any bookings, which was done by visitors. Also at this page you can make specific actions for the bookings (please check at the feature list and live demos, what actions are available in specific versions of Booking Calendar).
"Add new booking" - at this page, you can add new booking manually from admin panel.
"Resources" (paid versions only) - at this page you can manage the booking resources. Booking resources can be any properties (like a rooms or cars...etc.) or services, which is make possible to have individual availability calendar for the each resource.
The free version of Booking Calendar have only one default booking resource, that's why this admin page do not exist in free version. Depend from the version of Booking Calendar in sub pages of the Resource menu you can set the cost of booking resources, rates, availability, which is depend from the season filters, or even set cost dependence from the number of selected dates or cost dependence from selection of options in selectboxes or checkboxes from your booking form. You can also set the coupons for discounts.
Please check at the feature list and live demos, what features are available in specific versions.
"Settings" at this page you can configure the different settings for the availability calendar or booking form. The paid versions have several sub menu pages for the configuration of form fields of the booking form, configuration of email templates for the different action notifications, configure and activation the online payment form integrations, search form configuration and users management. Please check at the feature list and live demos, what features are available in specific versions.
Inside of the "Widget" WordPress menu page you can activate and configure the booking calendar widget(s). In the paid versions are possible to activate several booking calendar widgets, each for the different booking resource.
Inside of the edit "Post" or "Page" WordPress admin page, at the edit content toolbar you can find the "Booking Calendar" button for the insertion booking form or just availability calendar into post or page.
You can add a new booking to the system using the admin panel at the Booking > Add Booking menu page.
You can select the date(s) in a calendar fill the booking form fields and press the submit button for the creation of new booking.
Booking Calendar Personal and higher versions.
At the paid versions You can select the "booking resource" at the top of the page, so you can select at what exactly resource you are want to make the bookings.
Booking Calendar Business Medium/Large versions.
At the Business Medium/Large versions in additional you can select the specific custom form at the top of the page, so you be able to make the bookings for the specific booking resource, using the specific custom booking form.
Terms: add booking, new booking.
You can check, modify and change the status or other properties of the booking(s) at the Booking Listing admin menu page. Please open this page, at the top of the page you will see the Filters and Actions toolbar, and the table of booking listing.
Depends from the version there will be available different additional tools and features.
Filter tab.
Using they filter tab you can specify, what exactly booking(s) you are need to show.
"Apply" button - press this button after configuration of parameters in the filter tab, the parameters of filter will apply to the search results and new booking listing will show.
"Booking resources" selection - (deault value: "All resources"), you can select to show the bookings only from specific booking resource or from all booking resource. (available in paid versions only).
"Booking Status" selection - {Pending/Approved/All (default) }, select to show bookings only of specific status.
"Booking dates" selection - {Actual dates (default) /Today/Previous dates/All dates / Next dates (select the number of dates) / Prior dates (select the number of dates) / Check in - Check out }, select to show bookings, which was done for the specific date(s) or date ranges.
"Only new" - set pressed or unpressed "Read" status of the bookings, to show only new or all bookings.
"Creation dates" selection - {Today/All dates (default) / Prior dates (select the number of dates) / Check in - Check out }, select to show bookings, which was created at the specific specific date(s) or date ranges.
"Filter by keyword" text field - show the bookings, what have snide of the booking form the specific keywords. (available in paid versions only).
"Payment" selection - {All (default)/ Paid OK/ Unknown status/ Not Completed/Failed / Custom (text field)}, select to show bookings only with specific payment status. (available in Business and higher versions only).
Min. Cost - Max. Cost fields - set showing the bookings for the specific cost interval. (available in Business and higher versions only).
"Sort" - {ID/Resource/Cost } - set order of the bookings in the booking listing table.
"Save as Default" button - Save the actual applied filter settings as a default. (available in paid versions only).
"Booking ID" text search field - Search from at the top right side for the fast searching of the specific booking by ID.
Actions tab.
You can apply these actions for the specific selected bookings (the checkbox at the left side of each such booking have to be checked) a the booking listing.
Approve / Unapprove buttons - change the status of the specific selected bookings to "Approved" or "Pending".
Delete button - completely delete the specific selected bookings.
Read / Unread buttons - set the specific selected bookings as read/unread. If you are set the specific bookings as read, the icon "New" at the left side near each bookings will hide. You can make also this operations on the specific single bookings by clicking on the icon "New" at the left side of booking.
Print button - show the print layout of the current visible page of booking listing. (available in paid versions only).
Export button - export the bookings of the current visible page of booking listing to the CSV format. (available in paid versions only).
Export All button - export the bookings from all pages of booking listing to the CSV format. (available in paid versions only).
Emails sending (checkbox) - set checked or unchecked this checkbox, if you are want that the email is sending or not sending for the specific actions, like: Approve/Unapprove, etc... This interface element is located under the Actions tab at the right side of page.
Booking Listing table.
The booking listing table have a several Columns: ID, Labels, Booking Data, Booking Dates, Actions.
ID collumn.
In the "ID" column in the fields of each booking you can see the ID of the specific booking, the date and time of creation of this booking. Also at this collumn is exist the checkbox for selections of specific booking(s) for the fuser actions using the tools from the Actions tab.
In additional at the left side you can find the "New" icon for the upcoming bookings. This icon is clickable, so you can disable the status of new (unread) for the specific single booking.
Lables collumn.
At this column you can see the status labels of the specific booking, like pending/approved or payment statuses (available in Business and higher versions only).
Data collumn.
At this field you can see the all data about the specific booking from your billing form:
First Name:Victoria Last Name:Smith Email:victoria@server.com Address: City: Post code: Country: Phone:(044)458-77-88 Number of visitors: 2 Children: no Details: Please, reserve an appartment with fresh flowers.
Booking dates column.
In this collumn you can see the bookings dates. Please note, at the head of the collumn you can find the icon for the activating extended dates showing:
for example: June 21, 2012, June 22, 2012, June 23, 2012
And normal dates view:
for example: June 21, 2012 - June 23, 2012
Actions collumn.
Cost settings - view or edit the cost of the specific booking (available in Business and higher versions only).
Send payment request - button for sending payment request to the visitor by email (available in Business and higher versions only).
Edit booking - edit the specific booking data at the admin panel (available in paid versions only).
Edit/create note to the booking - add or edit the note for the specific booking (available in paid versions only).
Approve/Unapprove - Instant changing the status of the single booking.
Delete - Completely erase specific booking.
Change resource - change the booking resource for the specific booking (available in paid versions only).
Change payment status - change the pay,ent status for the specific booking (available in Business and higher versions only).
Shortcodes
Booking Form
[booking type=1 nummonths=2 form_type='standard']
Specify the full calendar width (one or several months in a row), the height of date cell (so its possible to configure the height of entire calendar by that (just divide the entire calendar width to 7 and you will get approximate date cell height), the number of months in one row (its useful, if you want to show several months in several rows, for example 4 months in 2 rows or 6 months in 2 rows etc).
Configuration rules
Example 1:
options='{calendar months_num_in_row=2 width=568px cell_height=30px}'
Example 2:
options='{calendar months_num_in_row=3 width=100% cell_height=40px}'
The general structure of the configuration calendar parameter is following:
{calendar months_num_in_row="{NUMBER OF MONTHs IN ONE ROW}"
width="{ENTIRE WIDTH OF CALENDAR IN px or %}"
cell_height="HEIGHT of CALENDAR DATE CELL, only in px"}
Parameters:
calendar - name of the parameter. Its always the same (Its required for the future extend functionality).
months_num_in_row - number of months on one row. Its can be any number.
width - the entire height of the calendar. This width can be in "px" (example: "400px") or in percentage (example "100%).
cell_height - height of calendar date cell. The height can be only in "px" (example "30px").
Specify that during certain seasons (or days of week), the specific minimum number of days must be booked, for example: visitor can select only 3 days starting at Friday and Saturday, 4 days - Friday, 5 days - Monday, 7 days - Saturday, etc...
Important! Please note, this feature is working only, if you activated the "Range days" selection at the General Booking Settings page.
Available in Business Medium / Large, MultiUser versions
Configuration rules
Example 1:
options='{select-day condition="season" for="High season" value="7-14,20"},
{select-day condition="season" for="Low season" value="2-5"}'
Example 2:
options='{select-day condition="weekday" for="1" value="4"},
{select-day condition="weekday" for="5" value="3"},
{select-day condition="weekday" for="6" value="2,7"}'
The general structure of the configuration one condition rule are following:
{select-day condition="{season|weekday}"
for="{Name of season filter|Number of week day}"
value="Number of days selection"}, ...
Parameters:
select-day - name of the rule. Its always the same (Its required for the future extend functionality).
condition - type of the condition. There are 2 types of the condition: "weekday" and "season". "weekday" - is mean that condition rule is based on the selected day of week value, like Monday, Tuesday, etc... . "season" - is mean that condition rule is based on the "season filter" name of selected date. In other words the condition is TRUE if the selected day is belong to some season filter in the Booking > Resources > Filters page.
for - value of the specific conditions. If the condition is true, so then the number of specific days selection will possible in the calendar. If the condition is set as "weekday" so then "for" can have the following numbers: 0 - Sunday, 1 - Monday, 2 - Tuesday, 3 - Wednesday, 4 - Thursday, 5 - Friday, 6 - Saturday.
value - number of specific days selection in the calendar, which can be selected by visitors. It can be simple number or several days separated by comma (example: "7,14,21,28") or by dash (example:"3-5", its the same like this: "3,4,5") or combination (example:"3-5,7,14", its the same like this: "3,4,5,7,14")
Examples:
Week days conditions.
[booking type=1 form_type='standard' nummonths=2
options='{select-day condition="weekday" for="1" value="4"},
{select-day condition="weekday" for="5" value="3"},
{select-day condition="weekday" for="6" value="2,7"}']
where values of the "for" parameter are mean following:
0 - Sunday,
1 - Monday,
2 - Tuesday,
3 - Wednesday,
4 - Thursday,
5 - Friday,
6 - Saturday
You can use only one number of the specific week day.
Its mean that on Monday is possible to select only 4 days,
on Friday is possible to select only 3 days,
on Saturday is possible to select only 2 or 7 days.
Season filters conditions.
[booking type=1 form_type='standard' nummonths=2
options='{select-day condition="season" for="High season" value="7-14,20"},
{select-day condition="season" for="Low season" value="2-5"}']
where values of the "for" parameter are mean following:
High season - its a name of the some Season filter on the Booking > Resources > Filters page,
Low season - its a name of the some Season filter on the Booking > Resources > Filters page
You can use only single season filter name in the one value.
Its mean that during High season is possible to select only 7, 8, 9, 10, 11, 12, 13, 14 or 20 days
and during the Low season is possible to select only 2, 3, 4 or 5 days
Description.
This configuration will allow to set the specific start day(s) selection (day(s) of week) for the specific Season Filters.
For example, in high season, you can allow start day selection only at Friday in the Low season (or any other days) to start day selection from any weekday.
1) I can suggest that you are activated the range days selection using 2 mouse clicks for the specific day(s) of week. For example for Friday.
2) So then inside of the page, where you are inserted the booking shortcode, you are need to have something like this, to allow any start day selection for the "Low season" days:
Available in Business Medium / Large, MultiUser versions
[booking type=1 form_type='standard' nummonths=6
options='{start-day condition="season" for="Low season" value="0,1,2,3,4,5,6"}']
Configuration of the Options parameter:
start-day – name of the rule. Its always the same.
condition – type of the condition. For this rule is available only 1 type of the condition: “season”.
season – is mean that condition rule is based on the EXACT “season filter” name of selected date. In other words the condition is TRUE if the selected day is belong to some season filter in the Booking > Resources > Filters page.
for – value of the specific condition – EXACT Name of Season Filter.
value – day(s) of week, where we can start selection for the specific season.
It can be simple number or several days separated by comma.
0 – Sunday,
1 – Monday,
2 – Tuesday,
3 – Wednesday,
4 – Thursday,
5 – Friday,
6 – Saturday
In update 6.1 or newer you can use new condition variable: options='{parameter name="my_param" value="value"}'
This option parameter can transfer custom value from this booking form shortcode into the content of booking form.
Available in Business Medium / Large, MultiUser versions
Example of shortcode usage:
[booking type=1 form_type='standard' nummonths=3
options='{parameter name="my_param" value="value"},{parameter name="other_param" value="other value"}']
Example of booking form customization:
[text some_field_name "my_param"]and
[text other_field_name "other_param"]
Important. Parameter name must be unique and exist only once in booking form.
Availability calendar (without booking form)
[bookingcalendar type=1 nummonths=1 startmonth='2020-01']
Specify the full calendar width (one or several months in a row), the height of date cell (so its possible to configure the height of entire calendar by that (just divide the entire calendar width to 7 and you will get approximate date cell height), the number of months in one row (its useful, if you want to show several months in several rows, for example 4 months in 2 rows or 6 months in 2 rows etc).
Configuration rules
Example 1:
options='{calendar months_num_in_row=2 width=568px cell_height=30px}'
Example 2:
options='{calendar months_num_in_row=3 width=100% cell_height=40px}'
The general structure of the configuration calendar parameter is following:
{calendar months_num_in_row="{NUMBER OF MONTHs IN ONE ROW}"
width="{ENTIRE WIDTH OF CALENDAR IN px or %}"
cell_height="HEIGHT of CALENDAR DATE CELL, only in px"}
Parameters:
calendar - name of the parameter. Its always the same (Its required for the future extend functionality).
months_num_in_row - number of months on one row. Its can be any number.
width - the entire height of the calendar. This width can be in "px" (example: "400px") or in percentage (example "100%).
cell_height - height of calendar date cell. The height can be only in "px" (example "30px").
Timeline
Month View mode (30):
[bookingtimeline type='1' header_title='All Bookings' scroll_day=4 scroll_start_date='2016-11-17']
3 Months View mode (90):
[bookingtimeline type='1' view_days_num=90 header_title='All Bookings' scroll_day=5 scroll_start_date='2016-11-17']
Year View mode (365):
[bookingtimeline type='1' view_days_num=365 header_title='All Bookings' scroll_month=3 scroll_start_date='2016-11-17']
Available in Paid versions
Day View mode (1):
[bookingtimeline type='1,5,6,7' view_days_num=1 header_title='All Bookings' scroll_day=4 scroll_start_date='2016-11-17']
Week View mode (7):
[bookingtimeline type='1,5,6,7' view_days_num=7 header_title='All Bookings' scroll_day=4 scroll_start_date='2016-11-17']
Month View mode (30):
[bookingtimeline type='1,5,6,7' header_title='All Bookings' scroll_month=2 scroll_start_date='2016-11-17']
2 Months View mode (60):
[bookingtimeline type='1,5,6,7' view_days_num=60 header_title='Bookings' scroll_month=2 scroll_start_date='2016-11-17']
[bookingtimeline type='3,4' options='{resource_link 3="/resource-apartment3-id3/"},{resource_link 4="/resource-3-id4/"}' header_title='All Bookings']Available since update 7.0.1Example 1:
[bookingtimeline type='1' limit_hours='9,22']Example 2:
[bookingtimeline type='1,5' view_days_num=1 limit_hours='10,21']Available since update 7.0.1
Selection of booking resource
Available in paid versions. You can check example of using this shortcode at this page.
[bookingselect label='Please select the resource:' form_type='standard' nummonths=1 type='17,16,15']
[bookingselect type='17,16,15' selected_type='15' first_option_title='' label='']
Specify the full calendar width (one or several months in a row), the height of date cell (so its possible to configure the height of entire calendar by that (just divide the entire calendar width to 7 and you will get approximate date cell height), the number of months in one row (its useful, if you want to show several months in several rows, for example 4 months in 2 rows or 6 months in 2 rows etc).
Configuration rules
Example 1:
options='{calendar months_num_in_row=2 width=568px cell_height=30px}'
Example 2:
options='{calendar months_num_in_row=3 width=100% cell_height=40px}'
The general structure of the configuration calendar parameter is following:
{calendar months_num_in_row="{NUMBER OF MONTHs IN ONE ROW}"
width="{ENTIRE WIDTH OF CALENDAR IN px or %}"
cell_height="HEIGHT of CALENDAR DATE CELL, only in px"}
Parameters:
calendar - name of the parameter. Its always the same (Its required for the future extend functionality).
months_num_in_row - number of months on one row. Its can be any number.
width - the entire height of the calendar. This width can be in "px" (example: "400px") or in percentage (example "100%).
cell_height - height of calendar date cell. The height can be only in "px" (example "30px").
Edit Booking
System shortcode for ability to edit or cancel exist booking by visitor, who made this booking. Or show payment form, after sending payment request.
[bookingedit]
Available in Paid versions
Search Availability Form
Search availability form - search availability for selected check in and check out dates (using date-picker fields), among several booking resources (properties or services). Possible to search only for full dates. Check more about this feature here. Watch it in this video guide. You can check example of using this shortcode at this page.
Available in Business Large / MultiUser versions
[bookingsearch searchresults='https://mysite.com/search-results/'
noresultstitle='Nothing Found' searchresultstitle='Search results:']
Available in MultiUser versions
For example:
[bookingsearch users="1,2"]where 1,2 – its a ID list of users.
Search Results
Showing search results at separate page, different from page with search availability form (more info about search availability form shortcode [bookingsearch], check at this page ).
You can search availability for selected check in and check out dates (using date-picker fields), among several booking resources (properties or services). Possible to search only for full dates. Check more about this feature here. Watch it in this video guide. You can check example of using this shortcode at this page.
[bookingsearchresults]
Available in Business Large / MultiUser versions
Booking Form (without calendar)
This shortcode is useful, if you need to receive several (specific number of bookings) for specific date. It's can be event, where exist restricted number of bookings for this date. You can use this shortcode for booking resource (with specific capacity). Check more about this feature here. Watch it in this video guide.
[bookingform type=1 form_type='standard' selected_dates='24.12.2020']
Available in Business Large / MultiUser versions
Showing booking resource details
Showing details about specific booking resource, like Title, Cost, Capacity or ID of booking resource.
Available in paid versions
[bookingresource type=1 show='title']
Possible values:
title - show title of booking resources
cost - show default cost of booking resource (from Booking > Resources page . Its can be cost per day, per night, per hour or fixed cost depend from your settings at Booking > Settings > Payment page. Available only in Business Small/Medium/Large, MultiUser versions
capacity - show capacity of booking resource - number of "child" resources. Available only in Business Large, MultiUser versions.
Configuration of Booking Calendar
Inserting booking form/availability calendar into the post or page.
Open the edit post or edit page menu page or add new page or post and inside of the edit content toolbar click on Booking Calendar button (button with calendar icon). Inside of the configuration popup dialog select your booking resource (in the paid versions only) and configure other options, like number of visible month of calendar, inserting the booking form with calendar or just availability calendar and insert the booking shortcode into the content of post or page. Publish or update the post or page, open it at client side of site and you will be able to see and make bookings in the booking form.
Booking Calendar Personal and higher versions.
In the paid versions of Booking Calendar (Personal, Business Small/Medium/Large, Multiuser), you will be able to select, in the popup configuration dialog additional parameter(s), like booking resource (your different properties, like rooms or services). It's mean that each booking calendar in the booking form, will have identification for the the specific booking resource. And you can make the different bookings for the same dates but in these
Booking Calendar Business Medium/Large versions
In additional at the Business Medium/Large versions of the Booking calendar, you can select the different booking forms (you can customize the different booking forms at these versions at the Booking > Settings > Fields page).
Terms: Personal, Business Small, Business Medium, Business Large, MultiUser, insert booking shortcode, insert booking form into post or page.
Inserting the booking form/calendar in sidebar widgets.
Please open the WordPress admin menu page: Appearance > Widgets configuration. Add the Booking Calendar widget to the one of your sidebars and configure the parameters, like a booking resource (in the paid versions only), number of visible month of calendar, inserting the booking form with calendar or just availability calendar etc...
Terms: Personal, Business Small, Business Medium, Business Large, MultiUser, widget, booking calendar widget.
Inserting the booking form/calendar into any other place of your site
You can insert the booking form or calendar into the any other place of your site by editing the PHP code of your theme files and insting the special code for that. Please read more detail about how to do this in the FAQ.
Terms: Personal, Business Small, Business Medium, Business Large, MultiUser, inserting booking calendar in any pace of your site.
Booking admin menu page path: Booking > Resources (available in paid versions only).
Booking Calendar Personal
Booking resources - it's your objects (like rooms, cars or tables) or services, what can be booked by visitors of your sites. You can add/delete/modify the booking resources at the Booking > Resource page.
You can define the calendar (booking form) to the specific booking resources, at the popup configuration dialog, during inserting the booking form into post or page.
Terms: Personal, Business Small, Business Medium, Business Large, MultiUser, resource configuration.
Booking Calendar Business Small / Medium
In additional, at the Resource menu page at these version, you can configure the cost per booking resource. You can set the cost at the specific field near each specific Booking Resource. At the same page (as at the general booking settings page, also) you can set the settings of cost calculation: per day, per night, per hour and fixed cost.
Cost per day - is mean that the cost, which you are set near your booking resource will be apply for the each selected day in calendar, when the visitor will make the reservation.
Cost per night - is mean that the cost, which you are set near your booking resource will be apply for the each night (the number of nights is equal number of days selected in calendar minus one day), when the visitor will make the reservation. If the visitor is select only one day, it's still mean one night selections. If visitor select 2 days, it's also mean the one night selection. If visitor select 3 days, it's mean 2 nights selections. If visitor select N days, it's mean N-1 nights selections, etc...
Cost per hour - is mean that the cost, which you are set near your booking resource will be apply for the each hour, if you are use the time selections/entering in booking form, when the visitor will make the reservation. If the visitor select several days, so then one full day calculated as 24 full hours, first and last day will be check in/out days and cost will be calculated depending from the check in/out (start/end) times (based on the 24 hours in a day).
Fixed cost - is mean that the cost, which you are set near your booking resource will be fixed and will not depend from number of days selections or time selections/entering in booking form, when the visitor will make the reservation.
Terms: Business Small, Business Medium, Business Large, MultiUser, cost configuration, resource configuration.
Booking Calendar Business Large
In additional, at the Resource menu page at this version, you can configure the capacity for the specific booking resource. Booking resource with specific capacity is mean, that the visitors at your site, can make several reservations per the same selected Full date(s) in the same calendar. In other words, the date(s) in a calendar (of specific booking resource with capacity high than one) will be available, until number of reservations per these date(s) is less then capacity of the booking resource. If the number of reservations for the specific dates will be equal to the capacity so then these date(s) become unavailable in the calendar at client side of site.
It's useful, when you are have several objects or properties like rooms of the same type or seats somewhere or cars of the same model, or slots per some service, etc... and you do not want to create the separate calendars (booking resources) for the all these items, but use only one specific calendar, and have a available dates in a calendar, until the number of reservations is less the capacity.
This concept is work only for the FULL dates and not a time slots. If you will use the time selection/entering in the booking form, it's will be recorded as data of booking into DB, but will not impact to the availability. For example: if you have booking resource with capacity = 3, and 2 time slot selections in the booking form, so your visitors can make maximum 3 reservations per the same selected date in a calendar. And not the the 6 reservations (3*2=6) for the date.
Settings of the capacity for the specific booking resource.
The setting capacity for the specific resource is based on the parent / child booking resources concept. If you create during first time the booking resource (inside of the parent field you will set none resource), it's will be the "single resource" and capacity of this resource is 1. If you want to increase the capacity of the specific booking resources you are need to create several booking resources ("child" resources) and in the field of "parent resource" at the resource adding form you are need to specify the resource, what capacity you are want to increase. These new resources is called "child" resources, the resource, which you select in the "parent resource" field is called "parent resource". So single resource become parent resource, when you add one or several "child resource" to that resource. The capacity of the specific booking resource is equal to the number of child resources plus this specific resource itself (so the parent resource is also calculated in capacity). Please note, you can add during one operation, several booking resources (by selecting the number of booking resources at the add new booking resource form), it's mean that you can increase the capacity a the specific number,higher than one during one operation.
Near each single or parent booking resource you can also set the "maximum number of visitors". This option is mean maximum number of visitors per the same single or "child" booking resources. For example you are have 5 single type rooms and 8 double type rooms, so then you can create the booking resource "Single room" with capacity 5 and maximum number of visitors as 1 (it's mean per room) and other resources "Double room" with capacity 8 and maximum number of visitors as 2 (it's mean 2 visitors per room)
Advanced options about the reservations of booking resources with specific resources.
What about situation, when you are need to decrease the capacity on a specific date, during reservation process, higher then one? In other words you are want to reserve the several slots (booking child resources) during one restating process.
It's possible using the visitors selection select box in the booking form. So you are need to use this select box shortcode (only this, other shortcodes for this operation is not supported) in the booking form customization page:
[select visitors "1" "2" "3" "4" "5"]
And at the General Booking Settings page at the "advanced settings" section, you are need to set checked this checkbox "Visitors number apply to capacity" (availability of the day (capacity) depends from number of selected visitors [visitors]).
You are also will have 2 sub radio button selections:
"1st radio button option" - "Show at tooltip on calendar availability based on free booking resource items.
Check maximum support of visitors at one booking resource with selected number of visitors from booking form"
"2nd radio button option" - "Show at tooltip on calendar availability based on sum number of visitors, which can be at free booking resource items.
Check maximum support of visitors at all booking resources with selected number of visitors from booking form"
Let describe the difference between these 2 radio subtions at the previous example: "we are have 5 single type rooms and 8 double type rooms - its mean we are have booking resource "Single room" with capacity 5 and maximum number of visitors as 1 and other resources "Double room" with capacity 8 and maximum number of visitors as 2".
So if we are set selected 1st radio button sub-option, so then in the mouse over popover in calendars we will see for the "Single room" booking resource the availability as 5 (if no bookings for that date), and for the "Double room" booking resource the availability as 8 (if no bookings for that date). In other words the availability in this case is counting depends only from the free "child" resources. If we try to make the bookings with visitor selections as 1 at select-box in the booking form, so then system will allow to make the bookings in the both resources (single and double room), and decrease the availability of those resources for that selected date(s) on 1.
If we are try to make the bookings with visitor selections as 2 at select-box in the booking form, so then system will allow to make the booking only for the "Double room" and do not allow todo that for the "Single room". It's because we are have maximum visitors per resources for "Single room" as 1, and have selection in the select box as 2 visitors, according the "Double room" we are have the maximum number of visitors per resource 2, and have selection in the select box as 2 visitors, so here we are can make the bookings. The availability in the "Double room" will decrease on 1 for that selected date(s) .
If we are select 3 visitors at the select box from the booking form, the system will not allow to make the bookings in the both resources, etc.
If we are set selected 2nd radio button sub-option, so then in the mouse over popover in calendars we will see for the "Single room" booking resource the availability as 5 = 5 free resources * 1 visitor per resource (if no bookings for that date), and for the "Double room" booking resource the availability as 16 = 8 free resources * 2 visitors per resource (if no bookings for that date). In other words the availability in this case is counting depends from the free "child" resources and maximum number of visitors per resource.
If we try to make the bookings with visitor selections as 1 at select-box in the booking form, so then system will allow to make the bookings in the both resources (single and double room), and decrease the availability of those resources for that selected date(s) on 1.
If we are try to make the bookings with visitor selections as 2 at select-box in the booking form, so then system will allow to make the bookings in both resources, also. But for the "Single room" its will reserve the 2 child sub resources (because we are have here maximum 1 visitor per resource) and for the "Double room" its will reserve the 1 child sub resources (because we are have here maximum 2 visitor per resource) . The availability in the resources decrease on 2 for that selected date(s) .
If we are select 3 visitors at the select box from the booking form, the system will allow to make the bookings in the both resources. For the "Single room" its will reserve the 3 child sub resources (because we are have here maximum 1 visitor per resource) and for the "Double room" its will reserve the 2 child sub resources (because we are have here maximum 2 visitor per resource, so we are have 2 visitors in one resource and 1 visitor in other child resource) . The availability in the resources decrease on 3 for that selected date(s) , etc...
Also at the same "Advanced settings" section we are have one more additional option:
"Disable bookings in different booking resources" - dissable booking, which can be stored in different booking resources. So if this checkbox is checked, the booking is allowed only, if all days of booking are at same booking resources, otherwise the error message will show.
1) Firstly you are need to create the booking resource "test" at the Booking > Resources page.
2) Then you are need to create the 2 child resources (during creation of the child resource, you are need to set the parent field as "test" resource) : "test1" and "test2",
So you will have the booking resources structure like this:
test
test1
test2
Because you are have 2 child resources and parent resource "test", together it's generate the capacity of the parent resource "test", which is equal to 3 in our example.
3) Now, by default the maximum number of visitors, which is allowed per resource is 1. So we will change it to 2. It's mean that per each resource (apartment), can be maximum 2 visitors.
So we will have the structure like this:
test. | Max visitors = 2 | capacity = 3
test1
test2
In other words we are have 3 apartment, and each apartment can have maximum 2 visitors per apartment.
4) Now important options at the general booking settings page:
Set capacity based on number of visitors: BOX
Check this box if you want total availability (daily capacity) to depend on the number of selected visitors [visitors]
Add tooltip on calendar(s) to show availability based on the number of available booking resource items remaining for each day.
Be sure to match the maximum number of visitors for the one booking resource with the number of visitors specified on the booking form.: RADIO BUTTON
Display tooltip on calendar(s) to show availability based on total (fixed) number of visitors for the resource, which can be at free booking resource items.
Be sure to match the maximum number of visitors for all booking resources with the number of visitors specified on the booking form.: RADIO BUTTON
A) If you are do not activate the "Set capacity based on number of visitors" so then, during reservation process you will book only ONE available booking resource, do not depend from the any number of visitors selections in the "visitors" select box. So it's mean if you are select 1 or 2 or 5 visitors in the select box at the booking form, you will reserve only one booking resource (firstly its will be parent resource "test", during the next new (second) reservation it's will be child resource "test 1" and during third reservation you will reserve "test 2" booking resource.
So if the "Set capacity based on number of visitors" is not checked, the availability for the specific date will be 3 (based on capacity only) and during reservation process the selection number of visitors will not impact to the Availability and just will be saved as a any other field.
B) If you will set checked the "Set capacity based on number of visitors" option and activate first radio button in sub settings:
Add tooltip on calendar(s) to show availability based on the number of available booking resource items remaining for each day.
Be sure to match the maximum number of visitors for the one booking resource with the number of visitors specified on the booking form.:
so then the Availability in the mouse over tooltip will be based on the capacity of the booking resource. So it's mean that for the free dates the availability will be show as 3, as in our previous example.
But during reservation process, you can not select more than 2 visitors in the select box. Because each booking resource, is support only 2 visitors per resource.
In other words, during reservation process you can reserve only 1 booking resource during one reservation, but the system is also check that the number of visitors, which you are selected in the booking form have to be not more then maximum number of visitors, which you are set at the Booking > Resource page. The availability in mouse over tooltip will be based on the capacity and in out example will be show as 3
C) and now last variant if you are selected the bottom radios button option:
Display tooltip on calendar(s) to show availability based on total (fixed) number of visitors for the resource, which can be at free booking resource items.
Be sure to match the maximum number of visitors for all booking resources with the number of visitors specified on the booking form.
So it's mean that availability over the specific date will be based on the capacity and number of maximum visitors per resource. In our example it's will be show as 6 ( 3*2=6).
During reservation process the system can book several booking resources, it's will calculate the visitors, which you are select in the booking form for the each booking resource (parent or child) and number of visitors per this resource.
So for example if you are select 3 visitors in the booking form. It's will reserve 2 booking resources. Because first resource is support 2 visitors and second is support also 2 but we are have only 1 (3-2=1), in other words one bed will be free in the second resource.
Terms: Business Large, MultiUser, resource capacity, parent resource, single resource, child resource, capacity concept, capacity.
Description
At the Booking Calendar Business Large (old Hotel Edition) and MultiUser versions are possible to set the capacity of the booking resources. It's mean that visitors of your site can make several bookings per same selected FULL (not a time slot) date in specific calendar (booking resource). It's usefull if you are have several rooms of the same type or several seats for some place or any other service or properties, where is need to have possibility to book several times for the same date. So at these versions are possible to set capacity of the booking resource, so date(s) in calendar will be available until number of reservations is less then capacity of the booking resource; but in these versions are possible to make reservation only for FULL date, not a time slots (time slots in this version only record data in DB, but not play any logic in reservation) for the booking resources with specific capacity.
Configuration
If you are need to configure the booking resource(s) with some capacity, so you are need to add the "child" resources to your "parent" resource at the top form of Booking > Resources admin page.
Just create one resource, and then create several child resources (set parent resource for them as a first resource), so the capacity of the first resource will increase.
Capacity it's number of times, which is possible to reserve the same date in calendar, based on number of selected visitors in the booking form. Resource its more like room, where is possible to be several seats for the visitors.
Here is examples of different configuration of capacity settings.
The availability (number of seats/maximum amount of people ) can be calculated only based on the "visitors" shortcode (shortcode
[select visitors "1" "2" "3" "4" "5"]in the Booking > Settings > Fields page at top form ). Its can not calculate availability based on the adults or children shortcodes.
You need to activate "Set capacity based on number of visitors" option at the general booking settings page at advanced section. After that you will see the maximum number of visitors at the Resources page.
Also you can read more here: https://wpbookingcalendar.com/help/booking-resource/
Let say you are having booking resources like this:
test   (parent resource, capacity = 3)   Max. visitors = 2
- test 1
- test 2
A) If you are do not activate the "Set capacity based on number of visitors" so then, during reservation process you will book only ONE available booking resource, do not depend from the any number of visitors selections in the "visitors" select box. So it's mean if you are select 1 or 2 or 5 visitors in the select box at the booking form, you will reserve only one booking resource (firstly its will be parent resource "test", during the next new (second) reservation it's will be child resource "test 1" and during third reservation you will reserve "test 2" booking resource.
If the "Set capacity based on number of visitors" is not checked, the availability for the specific date will be 3 (based on capacity only) and during reservation process the selection number of visitors will not impact to the Availability and just will be saved as a any other field.
B) If you will set checked the "Set capacity based on number of visitors" option and activate first radio button in sub settings:
Note: Be sure to match the maximum number of visitors for the one booking resource with the number of visitors specified on the booking form.
Then the Availability in the mouse over tool-tip will be based on the capacity of the booking resource. So it's mean that for the free dates the availability will be show as 3, as in our previous example.
But during reservation process, you can not select more than 2 visitors in the select box. Because each booking resource, is support only 2 visitors per resource.
In other words, during reservation process you can reserve only 1 booking resource during one reservation, but the system is also check that the number of visitors, which you are selected in the booking form have to be not more then maximum number of visitors, which you are set at the Booking > Resource page. The availability in mouse over tooltip will be based on the capacity and in out example will be show as 3
C) And now last variant, if you had selected the bottom radios button option:
Note: Be sure to match the maximum number of visitors for all booking resources with the number of visitors specified on the booking form.
So it's mean that availability over the specific date will be based on the capacity and number of maximum visitors per resource. In our example it's will be show as 6 ( 3 * 2 = 6 ).
During reservation process the system can book several booking resources, it's will calculate the visitors, which you are select in the booking form for the each booking resource (parent or child) and number of visitors per this resource.
So for example if you are select 3 visitors in the booking form. It's will reserve 2 booking resources. Because first resource is support 2 visitors and second is support also 2 but we are have only 1 ( 3 - 2 = 1 ), in other words one bed will be free in the second resource.
How all this capacity concept is working for search availability in search form at front-end side ?
You can test search form in action at the live demo of Booking Calendar Business Large version.
During searching availability in search form, number of selected visitors (shortcode [search_visitors] in the search form at Booking > Settings > Search page), can work in several ways. It's depend from selected or do not selected option: "Set capacity based on number of visitors" at the General Booking Settings page in advanced section and selected additional parameters.
A) If "Set capacity based on number of visitors" option UNCHECKED (not selected), then search availability form will search for available booking resources only based on the Check In/Out dates and possible some other parameters, but its will not depend from the selected number of visitors.
You can select any number of visitors and its will show items in search results, if other parameters (check in/out dates and possible some other parameters fit to selected options in search form).
B) If "Set capacity based on number of visitors" option CHECKED and you activated this sub option:
Note: Be sure to match the maximum number of visitors for the one booking resource with the number of visitors specified on the booking form.
Then during search process, the number of visitors (selected in the search form) must be equal or less then maximum number of visitors per booking resources (that you set at the Booking > Resources page). Its does not depend from the number of available "child booking resources", if the booking resource was configured with specific capacity (have child booking resources) and this booking resources (or at least one child booking resource) have available dates that you are searching.
C) If "Set capacity based on number of visitors" option CHECKED and you activated this sub option:
Note: Be sure to match the maximum number of visitors for all booking resources with the number of visitors specified on the booking form.
Then during search process, the number of visitors (selected in the search form) must match the maximum number of visitors for all booking resource. Its means that availability per booking resource calculated as number of maximum visitors per resource multiply on capacity of booking resources (number of child booking resources). If we are having booking resource with capacity 3 (2 child booking resources), and maximum number of visitors as 2. Then maximum availability = 2 * 3 = 6 And its means that, if we selected 6 visitors in the search form we fit to get this booking resource in search results. If we select more than 6 visitors, then we do not match this criteria and this booking resource will not show in the search results.
You can find it at the Booking > Settings > Form page (available in paid versions only).
Please use shortcode generator at the right side of the Booking > Settings > Form page for the fast and correct creation of booking form fields.
Booking Form Fields setting
Inside of this form, you can use the text, HTML tags and special short codes for the form fields.
General shortcode rule for fields insertion
[shortcode_type* field_name "value"]
shortcode_type - its a reserved term, for the definition type of booking field (like a text field or select box, etc). Please check the full list of these terms bellow.
Parameters:
* - this symbol means that this field is Required (can be skipped in shortcode)
field_name - field name, must be unique (can not be skipped), you can use any letter or "_"symbol.
"value" - default value of field (can be skipped)
In addition you can define the "ID" and CSS "CLASS" of HTML element, in such way:
[shortcode_type* field_name id:id-of-element class:class-name "value"]
where "id-of-element" - its ID of element, "class-name" - its CSS CLASS of element.
Shortcodes of form fields
[calendar] - calendar. Insert the booking availability calendar into the booking form.
[email] - email field, Example:
[email* my_email]. This field is required and have to be inside of the each booking form customization.
[captcha] - CAPTCHA. Insert the captcha into the booking form. Please note, you are need to activate using of the captcha at the general booking form, also.
[text] - text field. Example:
[text firt_name "John"]
[select] - select field, Example:
[select my_slct "1" "2" "3"]
If you want to use the different option titles from the option values,
you can use the select box options in this format: Option-Title@@Option-Value
Example:
[select my_day_parts "Morning@@08:00 - 12:00" "Evening@@13:00 - 17:00" "Full day@@08:00 - 17:00"]
[checkbox] - checkbox field,
Example #1:
[checkbox my_radio ""]
Example #2:
[checkbox my_radio default:on ""]- checked by default
Example #3:
[checkbox my_radio "TV" "Player"]- several values
[textarea] - textarea field, Example:
[textarea my_details ""]
[country] - countries list field,
Example #1:
[country]- default usage
Example #2:
[country "US"]- country selected by default as "United States of America"
[submit] - submit button, Example:
[submit "Send"]
Time shortcodes (Business Small/Medium versions)
Entering the time using the text fields (you can enter the time only in 24 hour time format)
[starttime] - start time field. Example:
[starttime].
[endtime] - end time field. Example:
[endtime].
[time] - additional time field (as an additional property). Do not apply to the dividing day into sections. Example:
[time my_tm]
Selection of time from predefined time slot list.
[select rangetime] - start and end time field in one drop-down list If you have predefined times (start and end time), use this code:
[select rangetime "10:00 - 12:00" "12:00 - 14:00" "14:00 - 16:00" "16:00 - 18:00" "18:00 - 20:00" ]
[select durationtime] - duration time field. If you set already start time, you can set duration of time using this shortcode:
[select durationtime "00:30" "01:00" "01:30" "02:00" "02:30" "03:00" ]. You do not require endtime.
[select starttime "12:00" "14:00"] - if you have already predefined check in time slots.
[select endtime "16:00" "20:00"] - if you have already predefined check out time slots.
(Business Medium/Large, MultiUser versions)
[cost_corrections] - enter direct cost at admin panel at page: "Add booking".
Example:
[cost_corrections]
Showing the cost in real time at booking form. (Business Medium/Large, MultiUser versions).
[cost_hint] - show cost hint for full booking in real time, depends from selection of days and form elements. Example:
The full cost for payment: [cost_hint]
[original_cost_hint] - show cost hint of original booking cost without additional costs for full booking in real time, depends only from days selection. Example:
The original cost for payment: [original_cost_hint]
[additional_cost_hint] - show cost hint of additional booking cost, which depends from selection of form elements. Example:
The additional cost for payment: [additional_cost_hint]
(Business Large, MultiUser versions)
[coupon] - coupon field, Example:
[coupon* my_coupon]
[lang=LOCALE] - start new translation section, where LOCALE - locale of translation
Use any other HTML tags (carefully).
Some other shortcodes available in new updates of Booking Calendar, as well.
Please use shortcode generator at the right side of the Booking > Settings > Form page for checking other available shortcodes.
"Content of booking fields data" form
Configuration of booking data showing in the booking listing page at "Booking Data" column and in the email templates, if used this shortcode - [content].
Use these shortcodes for customization:
Use any other HTML tags (carefully).
It's possible at the Booking Calendar Business Small and Business Medium versions of Booking Calendar in update 4.1 or newer.
You can activate "Use check in/out time:" option at the General Booking Settings page.
Then in the sub-settings set the "Check in" time as 15:00 and "Check out" time as 10:00. (You can set the different times there, but be sure to set the "Check In" time older than "Check Out").
Save the settings page.
Now, your visitors will be able to use the same date as check in/out date for the different bookings, its mean if the some booking is finished on the specific date, other visitor can start the new booking on the same specific date.
The check in/out days in calendar will be marked as half booked (diagonal line) and not by clock icon as for the usual timeslots.
Please note, this option will apply globally to the all booking resources and will overwrite any time slots, if you will use them in the booking form.
If you are need to use just time slots in the booking form, so you are need to deactivate this option and configure the time slot selection at the Booking > Settings > Fields page. Please read more about the booking form fields configuration here.
At the Business Small and higher versions of Booking Calendar are supported several payment systems integrations.
Each payment system support own list of currencies.
So you can change and check the list of the currency at the Booking > Settings > Payment page at the each section of payment system integrations.
Description
Available in Booking Calendar Business Medium or higher versions.
This feature provide possibility to use the different time slots selections in the booking form for the different week days or different days, which assigned to the specific season filters. So each week day (day of specific season filter) can have different time slots list.
Configuration
You can configure the time slots at the Booking > Settings > Fields page. If you are not familiar with the booking form fields configuration, please read firstly about the booking form fields configuration here.
The general structure of the configuration condition rule are following:
[condition name="FILTER-NAME" type="FILTER-TYPE" value="VALUE"]
CONTENT (any HTML or form fields shortcodes), showing if these condition is TRUE
[/condition]
name - its the unique name of the condition group, several conditions with different values. For example, if you want to have the different time slots for the different week days, you will be have the several conditions, with the same name but with different value parameters in conditions. Please check more about it, in the examples.
type - type of the condition. There are 2 types of the condition: "weekday" and "season". "weekday" - is mean that condition rule is based on the selected day of week value, like Monday, Tuesday, etc... . "season" - is mean that condition rule is based on the "season filter" name of selected date. In other words the condition is TRUE if the selected day is belong to some season filter in the Booking > Resources > Filters page.
value - value of the specific conditions. If the value is true, so then the content of the conditions is showing in the booking form. You can have the default value (empty - "", or like this - "*") for showing the content of this condition, if all other conditions is FALSE, or at initial stage, when the date in calendar is not selected yet.
Examples:
Week days conditions.
[condition name="weekday-condition" type="weekday" value="*"]
Default:   [select rangetime  "10:00 - 11:00" "11:00 - 12:00" "12:00 - 13:00" "13:00 - 14:00" "14:00 - 15:00" "15:00 - 16:00" "16:00 - 17:00" "17:00 - 18:00"]
[/condition]
[condition name="weekday-condition" type="weekday" value="1,2"]
Monday, Tuesday:    [select rangetime  "10:00 - 12:00" "12:00 - 14:00"]
[/condition]
[condition name="weekday-condition" type="weekday" value="3,4"]
Wednesday, Thursday:  [select rangetime  "14:00 - 16:00" "16:00 - 18:00" "18:00 - 20:00"]
[/condition]
[condition name="weekday-condition" type="weekday" value="5,6,0"]
Friday, Saturday, Sunday:  [select rangetime  "10:00 - 12:00" "12:00 - 14:00" "14:00 - 16:00" "16:00 - 18:00" "18:00 - 20:00"]
[/condition]
"*" - default value, if no dates are selected, or none of the exist condition is true.
0 - Sunday,
1 - Monday,
2 - Tuesday,
3 - Wednesday,
4 - Thursday,
5 - Friday,
6 - Saturday
You can use the several values, separated by comma.
Season filters conditions.
[condition name="season-times" type="season" value="*"]
Default: [select rangetime "14:00 - 16:00" "16:00 - 18:00" "18:00 - 20:00"]
[/condition]
[condition name="season-times" type="season" value="High_season"]
High season: [select rangetime  "10:00 - 12:00" "12:00 - 14:00" "14:00 - 16:00" "16:00 - 18:00" "18:00 - 20:00"]
[/condition]
[condition name="season-times" type="season" value="Low_season"]
Low season: [select rangetime "12:00 - 14:00" "14:00 - 16:00"]
[/condition]
High_season - its a name of the some Season filter on the Booking > Resources > Filters page,
Low_season - its a name of the some Season filter on the Booking > Resources > Filters page
You can use only single season filter name in the one value.
Additional info.
Please note, if you will activate the "Multiple days" selection or "Range days" selection in the General Booking Settings page at calendar section, so all these conditions will be based on the "first" day of that selection in the calendar.
Description
Available in Booking Calendar Business Medium or higher versions.
This feature provide possibility to show the different form fields or any other HTML content in the booking form, depends from the selection of specific week day in calendar or different days, which assigned to the specific season filters.
Configuration
If you are not familiar with the booking form fields configuration, please read firstly about the booking form fields configuration here.
The general structure of the configuration condition rule are following:
[condition name="FILTER-NAME" type="FILTER-TYPE" value="VALUE"]
CONTENT (any HTML or form fields shortcodes), showing if these condition is TRUE
[/condition]
name - its the unique name of the condition group, several conditions with different values. For example, if you want to have the specific HTML content for the different week days, you will be have the several conditions, with the same name but with different value parameters in conditions. Please check more about it, in the examples.
type - type of the condition. There are 2 types of the condition: "weekday" and "season". "weekday" - is mean that condition rule is based on the selected day of week value, like Monday, Tuesday, etc... . "season" - is mean that condition rule is based on the "season filter" name of selected date. In other words the condition is TRUE if the selected day is belong to some season filter in the Booking > Resources > Filters page.
value - value of the specific conditions. If the value is true, so then the content of the conditions is showing in the booking form. You can have the default value (empty - "", or like this - "*") for showing the content of this condition, if all other conditions is FALSE, or at initial stage, when the date in calendar is not selected yet.
Examples:
Week days conditions.
[condition name="weekday-condition" type="weekday" value="*"]
Default:   [select rangetime  "10:00 - 11:00" "11:00 - 12:00" "12:00 - 13:00" "13:00 - 14:00" "14:00 - 15:00" "15:00 - 16:00" "16:00 - 17:00" "17:00 - 18:00"]
[/condition]
[condition name="weekday-condition" type="weekday" value="1,2"]
Monday, Tuesday:    [select rangetime  "10:00 - 12:00" "12:00 - 14:00"]
[/condition]
[condition name="weekday-condition" type="weekday" value="3,4"]
Wednesday, Thursday:  [select rangetime  "14:00 - 16:00" "16:00 - 18:00" "18:00 - 20:00"]
[/condition]
[condition name="weekday-condition" type="weekday" value="5,6,0"]
Friday, Saturday, Sunday:  [select rangetime  "10:00 - 12:00" "12:00 - 14:00" "14:00 - 16:00" "16:00 - 18:00" "18:00 - 20:00"]
[/condition]
"*" - default value, if no dates are selected, or none of the exist condition is true.
0 - Sunday,
1 - Monday,
2 - Tuesday,
3 - Wednesday,
4 - Thursday,
5 - Friday,
6 - Saturday
You can use the several values, separated by comma.
Season filters conditions.
[condition name="season-times" type="season" value="*"]
Default: [select rangetime "14:00 - 16:00" "16:00 - 18:00" "18:00 - 20:00"]
[/condition]
[condition name="season-times" type="season" value="High_season"]
High season: [select rangetime  "10:00 - 12:00" "12:00 - 14:00" "14:00 - 16:00" "16:00 - 18:00" "18:00 - 20:00"]
[/condition]
[condition name="season-times" type="season" value="Low_season"]
Low season: [select rangetime "12:00 - 14:00" "14:00 - 16:00"]
[/condition]
High_season - its a name of the some Season filter on the Booking > Resources > Filters page,
Low_season - its a name of the some Season filter on the Booking > Resources > Filters page
You can use only single season filter name in the one value.
Additional info.
Please note, if you will activate the "Multiple days" selection or "Range days" selection in the General Booking Settings page at calendar section, so all these conditions will be based on the "first" day of that selection in the calendar.
Please note, this configuration is possible at the Business Medium or higher versions.
Description
If you are need to add the additional costs, like tax or some other additional charges (cleaning,breakfast, excursion...), or just increase the cost depend from the visitor number selection at the selectbox, which is depend from the selection of the selectboxes or checkboxes in the booking form, so then you can make this configuration in the Business Medium or higher versions.
Configuration
1) You can insert into the Booking form, at the Booking > Settings > Fields page some checkbox, like this:
Tax: [checkbox* my_tax ""]
If you are need to have this checkbox invisible and checked by default in this way:
</p>
<div style="display:none;">[checkbox* my_cleaning ""]</div>
<p>
If you are need to have this checkbox checked by default so use it in this way:
Cleaning service: [checkbox* my_cleaning default:on ""]
For the selectbox, its can look like this:
</p>
<p>Visitors [select visitors "1" "2" "3" "4"]</p>
<p>
Please read more about the booking form fields configuration here
2) Then at the Booking > Resources > Advanced cost page at the advanced cost management section for the option my_tax or/and visitors, set some additional cost.
For example, for the tax 6% you need to set value 106% there.
Or if you want to add the fixed cost value, you can set this value to this "my_cleaning" option:
my_cleaning = 50
or for the visitors selections you can leave this configuration:
visitors:
1 = 100%
2 = 200%
3 = 300%
4 = 400%
etc....
Its possible to use arithmetic expressions, including fields shortcodes and simple mathematics operations at the Booking > Resources > Advanced cost page.
Its useful, when you are having checkbox (or selectbox), and want to apply some additional cost depend from selected option in other selectbox or checkbox in booking form.
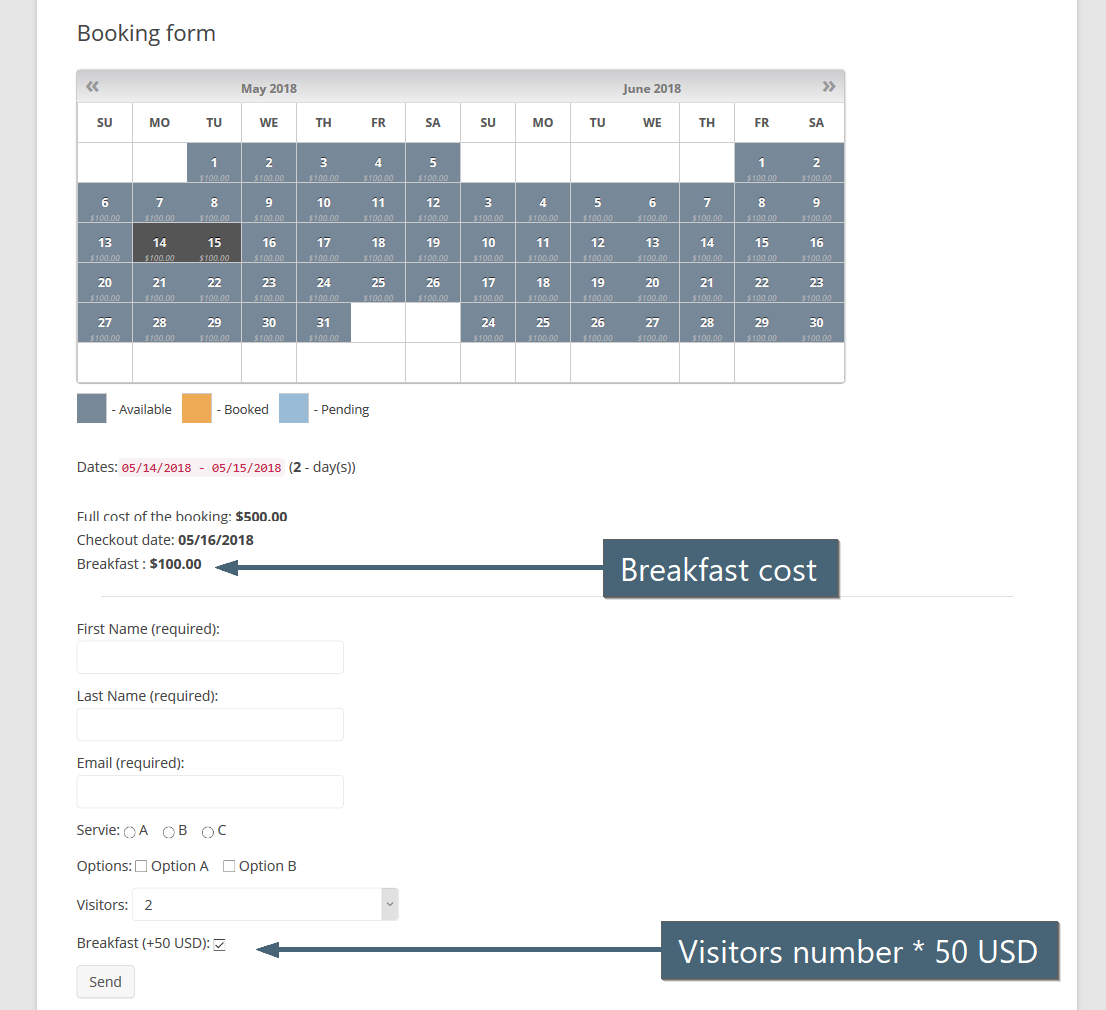
1) For example, you are having increase of booking cost depend from visitors selection ( in N times),
and also you need to add 50 USD for a breakfast per each visitor, if some checkbox is selected.
Example of configuration fields in the booking form at the Booking > Settings > Form page:
</p>
<p>Visitors:  [select visitors "1" "2" "3" "4" "5"]</p>
<p>Breakfast (+50 USD):  [checkbox breakfast ""]</p>
<p>

In this case you can configure at the Booking > Resources > Advanced cost page for visitors option:
[visitors]
1 = 100%  of total booking cost
2 = 200%  of total booking cost
3 = 300%  of total booking cost
4 = 400%  of total booking cost
5 = 500%  of total booking cost
And for breakfast selection you can define expressions like this:
( [visitors] * 50 )
where [visitors] its shortcode of field from the Booking > Settings > Form page in "Content of booking fields data" form.
2) Shortcodes, its the names of form fields, from the "Content of booking fields data" form in Booking > Settings > Form page.
Each such shortcode will be replaced to digital number relative to selected option or checkbox.
3) In case, if the options in selectboxes or checkboxes does not have numbers (but some strings), please DO NOT use such shortcodes!
For example, if you have shortcode like this in booking form:
[select visitors "1" "2" "3" "4"]
so then you can use [visitors] shortcode at the Booking > Resources > Advanced cost page.
But if you are having shortcode like this at the Booking > Settings > Form page:
[select visitors "Person 1" " Person 2" " Person 3" " Person 4"]
so then you CAN NOT use shortcode [visitors] in the Booking > Resources > Advanced cost page.
4) Tip. The value of each selected checkbox = 1 and value of not checked checkbox is 0.
5) Please note, you need to use parentheses ( and ) to separate each mathematical operation.
Please use instead of expression like this
5 - 3 * 2this expression
( 5 - ( 3 * 2 ) )otherwise, the result will be 4 instead of correct -1
Supporting since update 8.2 in Booking Calendar Business Medium or higher versions.
1) Firstly, create a new post or page, and insert into content of the page this shortcode:
[bookingedit]
You can just click at the booking button at edit toolbar and then at popup dialog select second tab for inserting this shortcode or just write manually it. Publish or update page and COPY the URL to this page.
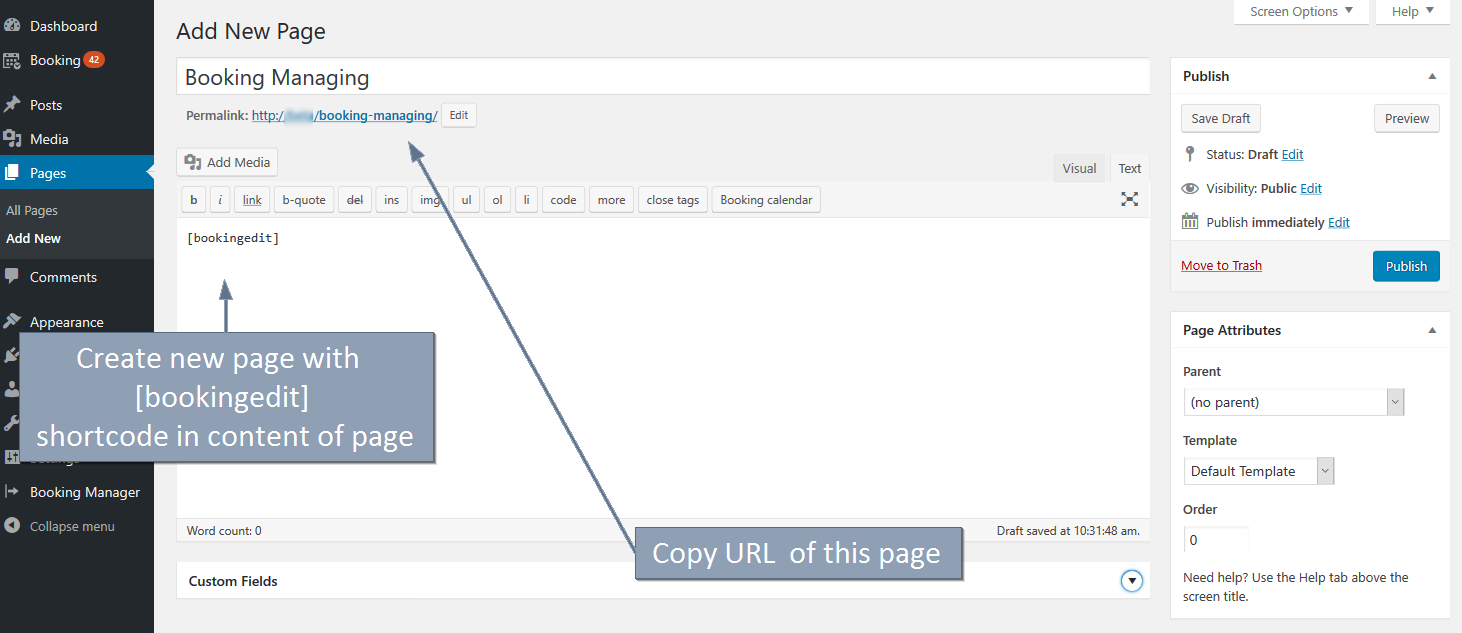
Important! Please note, if you open this page directly, you will see this warning "You do not set any parameters for booking editing". It's because system allow to open this page only from link(s) in email templates, which your website visitor had to received, after he/she made the booking (inside of that link will be specific parameter (secret HASH) for the identification of the booking).
2) Now, open the general booking settings page and at the "Advanced section" for field: "URL to edit bookings" write (paste) the URL to the page from point #1. Save the changes of this settings page.

3) Open Booking > Settings > Emails page and inside of email template(s), where it's possible (you can check it at help section under the each email template), you can use these shortcodes (for the inserting links into the email templates), which are sending to the visitors:
[visitorbookingediturl]- inserting link of booking editing by visitor at client side of site,
[visitorbookingcancelurl]- inserting link for booking cancellation by visitor at client side of site,

[visitorbookingpayurl]- inserting link to payment page for visitor at client side of site.

4) You can test it for a new bookings.
Sync
1) Requirements. This functionality available in the Booking Calendar update 8.0 or newer version.
So if you are using some older paid version of Booking Calendar, then you can request the new update of Booking Calendar on this page: https://wpbookingcalendar.com/request-update/
2) Requirements. Additionally for ability to import bookings from external websites, like Airbnb, Booking.com, HomeAway, TripAdvisor, VRBO, FlipKey and any other calendar that uses .ics format, you will be need to install Booking Manager plugin update 2.0 or newer ( https://wordpress.org/plugins/booking-manager/ ).
3) Getting URL of .ics feed. Now, when you have installed both plugins, you can start configuring of import events/bookings from external website.
First of all you need to get URL of .ics feed, from where you want to import the events/bookings.
Let make example based on Google Calendar. At other websites, you need to check help documentation where exactly you can find URL of .ics feeds: Airbnb, Booking.com, HomeAway, TripAdvisor, VRBO, FlipKey
3.1) Open Google Calendar then mouse over specific calendar and click on settings icon at right side near specific calendar, then click on "Settings and Sharing" link.

3.2) Scroll to "Integrate calendar" section, and copy URL of "Secret address in iCal format"

4) Inserting Booking Manager import shortcode(s). You will be need to insert the Booking Manager Shortcode for importing of events into some post or page.
The easiest way todo this is clicking on "Booking Manager" button in edit content toolbar:

Then in popup dialog switch to the "Import .ics feed into WPBC" tab.
Paste URL to your .ics feed in specific feed, and configure other parameters, like booking resource (in paid versions), where you want to import bookings, start and end date of import and other parameters.

Please read more about manual configuration of Booking Manager import shortcode at this page.
5) Publish such page(s)

Please note, now, when someone will visit this page, the import process from this specific .ics feed will start into the booking resource, which you have specified in booking manager shortcode.
When you will visit such page, so then you will see how many bookings was imported:

6) CRON. Its means that you need to visit such page periodically for start importing of bookings that can be created at other website. The best way its to configure CRON at your server for periodic access such page(s) and import of bookings from different sources. Please read more about CRON .
Probably you will be need to contact your server administrator or support of hosting, if you will have some difficulties with configuring CRON at your server.
Repeat steps 3 - 6 for different .ics feeds from different sources and for different booking resources (in paid versions of Booking Calendar).
7) TIP. As you can see from Booking Manager Shortcode, you can define in shortcode different URL to .ics feed and specific booking resource (in paid version). Using such shortcodes in different pages give a great flexibility to import from different .ics feeds (sources) into the same resource. Like one page for import from Airbnb and other page with different shortcode for importing from booking.com or Google Calendar. Also you can define different time interval in your CRON for accessing different pages and its means to start import of bookings with different intensity.
1) Requirements. This functionality available in the Booking Calendar update 8.0 or newer version.
So if you are using some older paid version of Booking Calendar, then you can request the new update of Booking Calendar on this page: https://wpbookingcalendar.com/request-update/
2) Requirements. Additionally for ability to export bookings into external websites, like Airbnb, Booking.com, HomeAway, TripAdvisor, VRBO, FlipKey and any other calendar that uses .ics format, you will be need to install Booking Manager plugin update 2.0 or newer ( https://wordpress.org/plugins/booking-manager/ ).
3) Export URLs. Now, when you have installed both plugins, you can start configuring of export bookings into external website.
Please open the Booking > Settings > Sync > Export -ics page.
Configure URLs for each booking resources (in paid versions). In the Booking Calendar Free version, you will see field for configuring URL for your one Default booking resource. Then click on Save changes button.

4) Import .ics in external website. Now you need to check documentation of each other external website, of how to start import of .ics feeds into specific services: Airbnb, Booking.com, HomeAway, TripAdvisor, VRBO, FlipKey
Important! Please note, once you have imported specific .ics feed into external website or application, its does not mean that this operation will be executed periodically. You need to check documentation of specific service (like AirBNB), for ability to import such .ics feeds periodically for having your bookings in external website always up to date.
Example of how to import .ics files in Google Calendar.

If you get error during generating .ics feed or getting just empty space instead of .ics feed.
In case, if you start import of .ics feed into Google Calendar by URL "Other Calendars > Add by URL", then in the point #3 you need to configure URL that ending with wpbm.ics. For example:
/ics/apartment2/wpbm.ics
1) So please try to configure link with wpbm.ics at the end of links at the Booking > Settings > Sync > "Export - .ics" page, like this:
/apartment2ics/wpbm.ics
After this click on icon near specific .ics feed url (check in point #3 in first screenshot point #3), its will open new .ics feed in new browser window. And you have to see .ics feed. Basically in browser window you have to copy full URL and then use it in other services.
2) If you still have an issue. Please recheck your error.log in your server configuration, about any relative errors.
If you can not find error.log file, please contact support of your hosting company about helping in finding this file.
Just to recheck about the reason of this issue. May be you have not activated some PHP module.
3) Be sure that you are using latest versions of Booking Calendar and Booking Manager.
What fields are exported from Booking Calendar to .ics feed?
Booking Calendar export bookings via .ics feeds by assigning these booking form fields to the fields in .ics feed:
SUMMARY
In the Booking Calendar Free version assign to 'SUMMARY' field in .ics feed, one of exist fields from your booking form, that can have names like this 'name', 'firstname', 'secondname', 'lastname'
In the paid versions of Booking Calendar possible to define, what exactly field from the booking form to assign to 'SUMMARY' field in the .ics feed. You can define it at the Booking > Settings General page in "Admin panel" section in the option "Booking title (admin panel)"
DESCRIPTION
Booking Calendar export all bookings details (that you have defined as fields at the Booking > Settings > Form page) to this field 'DESCRIPTION' in the .ics feed.
Please note, in the paid versions, all such bookings details defined at the "Content of booking fields data" form at the Booking > Settings > Form page.
01. To get Google Calendar API key please follow this instruction:
- Go to Google Developer Console: https://console.developers.google.com. And then click on Credentials link.

- If you do not have projects yet, please click "Create Project".

- Give your project a name and click "Create".

- Click on "Create credentials" to expand dropdown list and select "API Key".
- Click on your "API Key" to edit it.

- Copy "API Key" (later we will paste it into Google API Key field at Booking > Settings > Sync > Google Calendar Events Import page in your WP admin panel). Then be sure to select "Key restriction" as "None" and click on Save button.
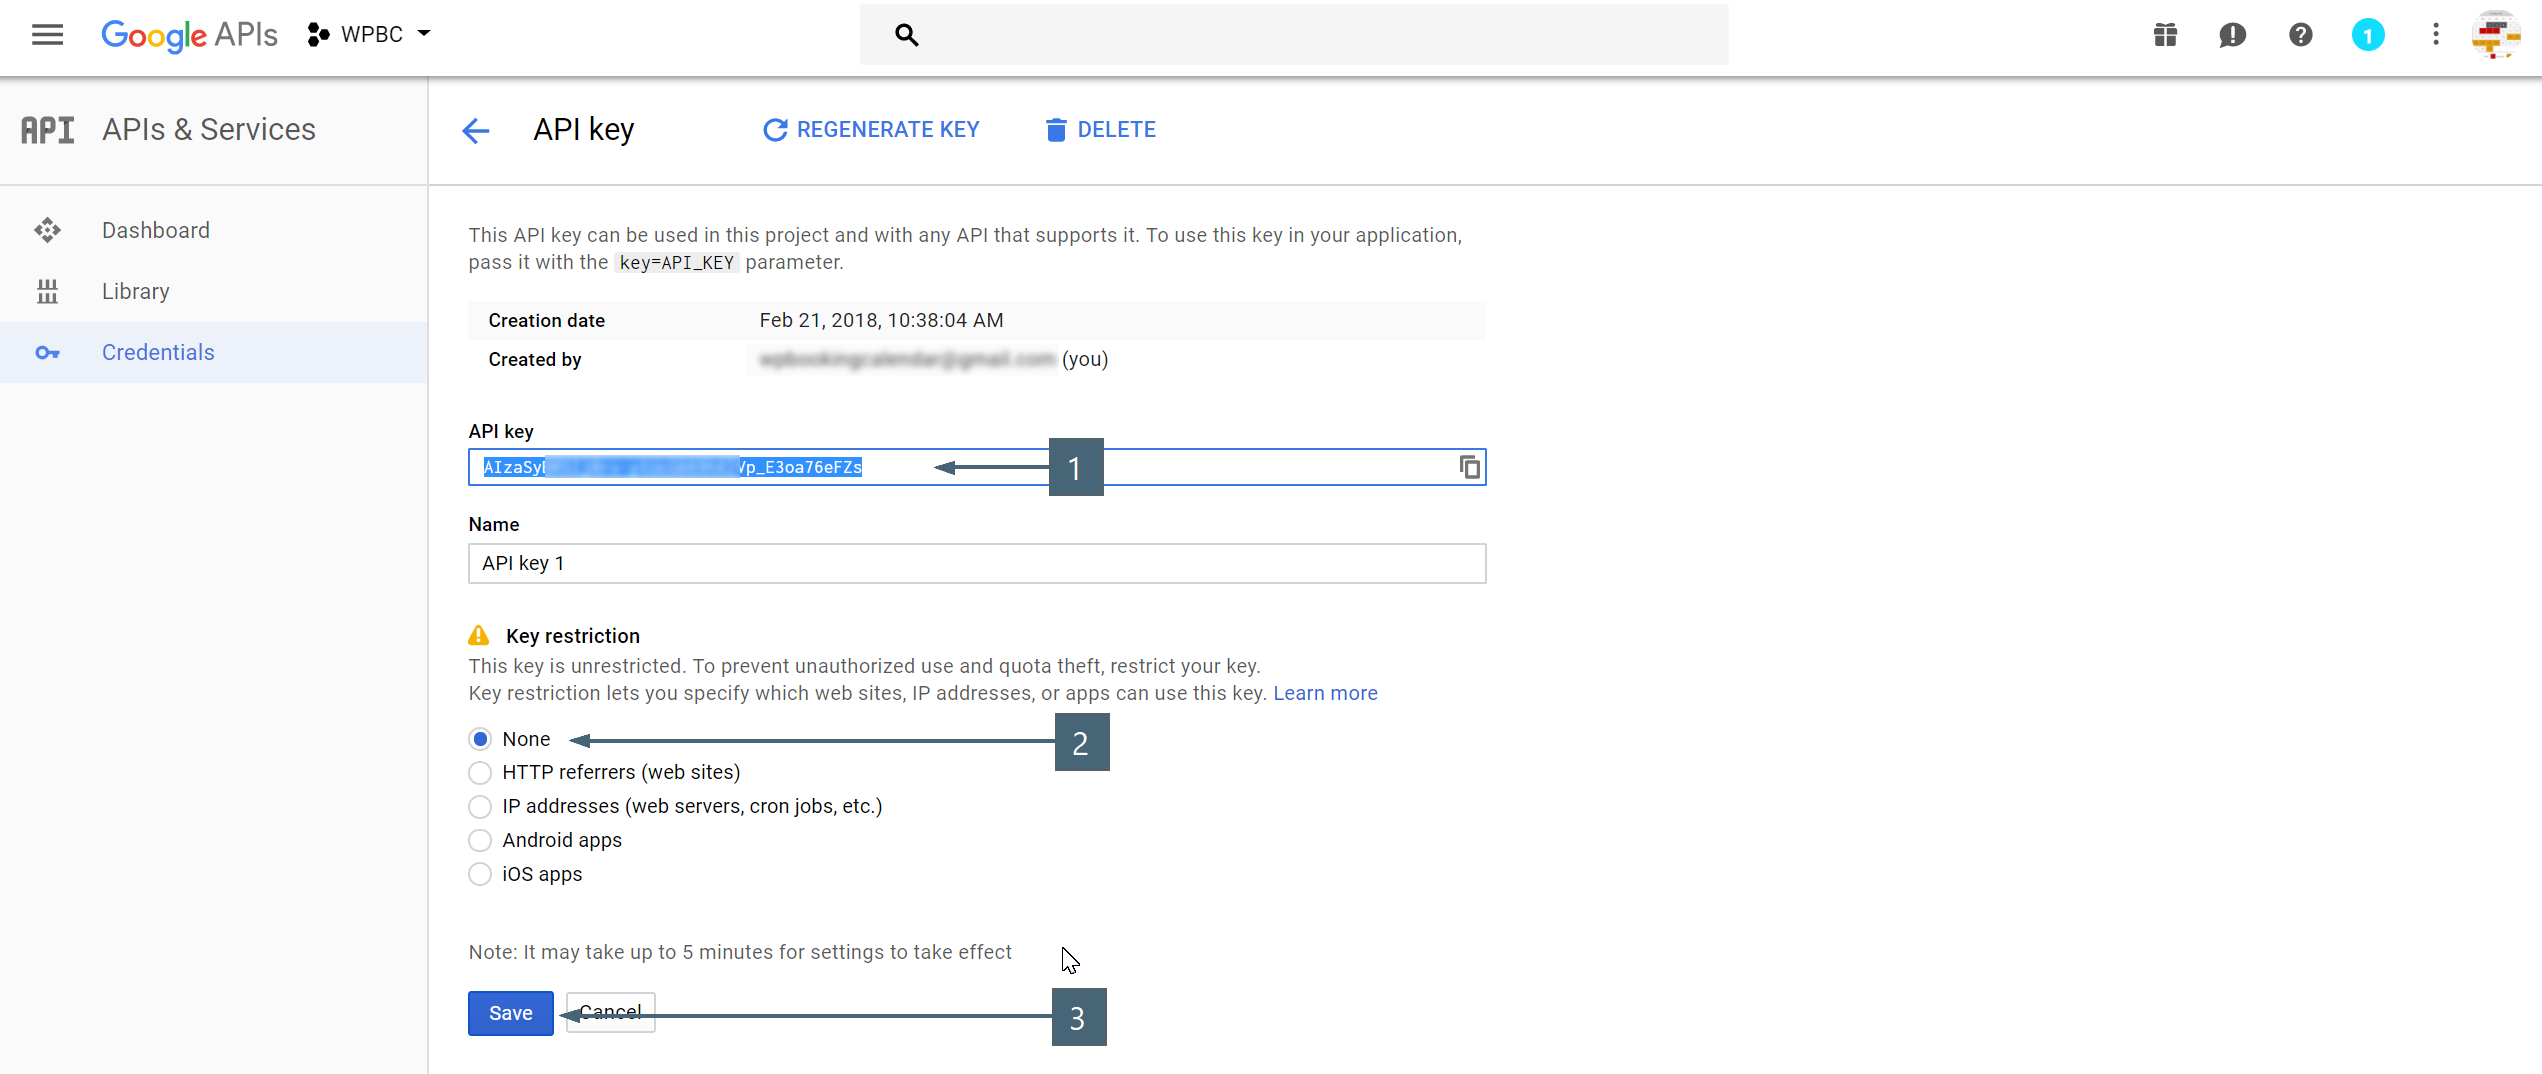
Please be sure that you have NOT restricted the Google API key, otherwise its can be reason of not ability to import events.
- Now in the sidebar click on "Library", and then click on "Calendar API" link


- Click on "ENABLE" link to enable your Google Calendar API

02. Set Your Calendar to Public:
- Navigate to your Google calendars.
- Open the settings for the calendar.


- Navigate to Access permissions section. Click the checkbox to "Make available to public". Do not select other option (be sure that was selected "See all events details"). Save settings.

03. Find Your Calendar ID:
- Navigate to your Google calendars.
- Open the settings for the calendar.
- Now copy the Calendar ID to use in the Booking > Settings > Sync > Google Calendar Events Import page in your WP admin panel for "Calendar ID" field(s).
Please be sure to use the Calendar ID in format like XXXXXX@group.calendar.google.com (or XXXXXX@gmail.com)
Do not use the entire XML feed URL (starting from http) and do not use simple ID (term before @), like: XXXXXX.
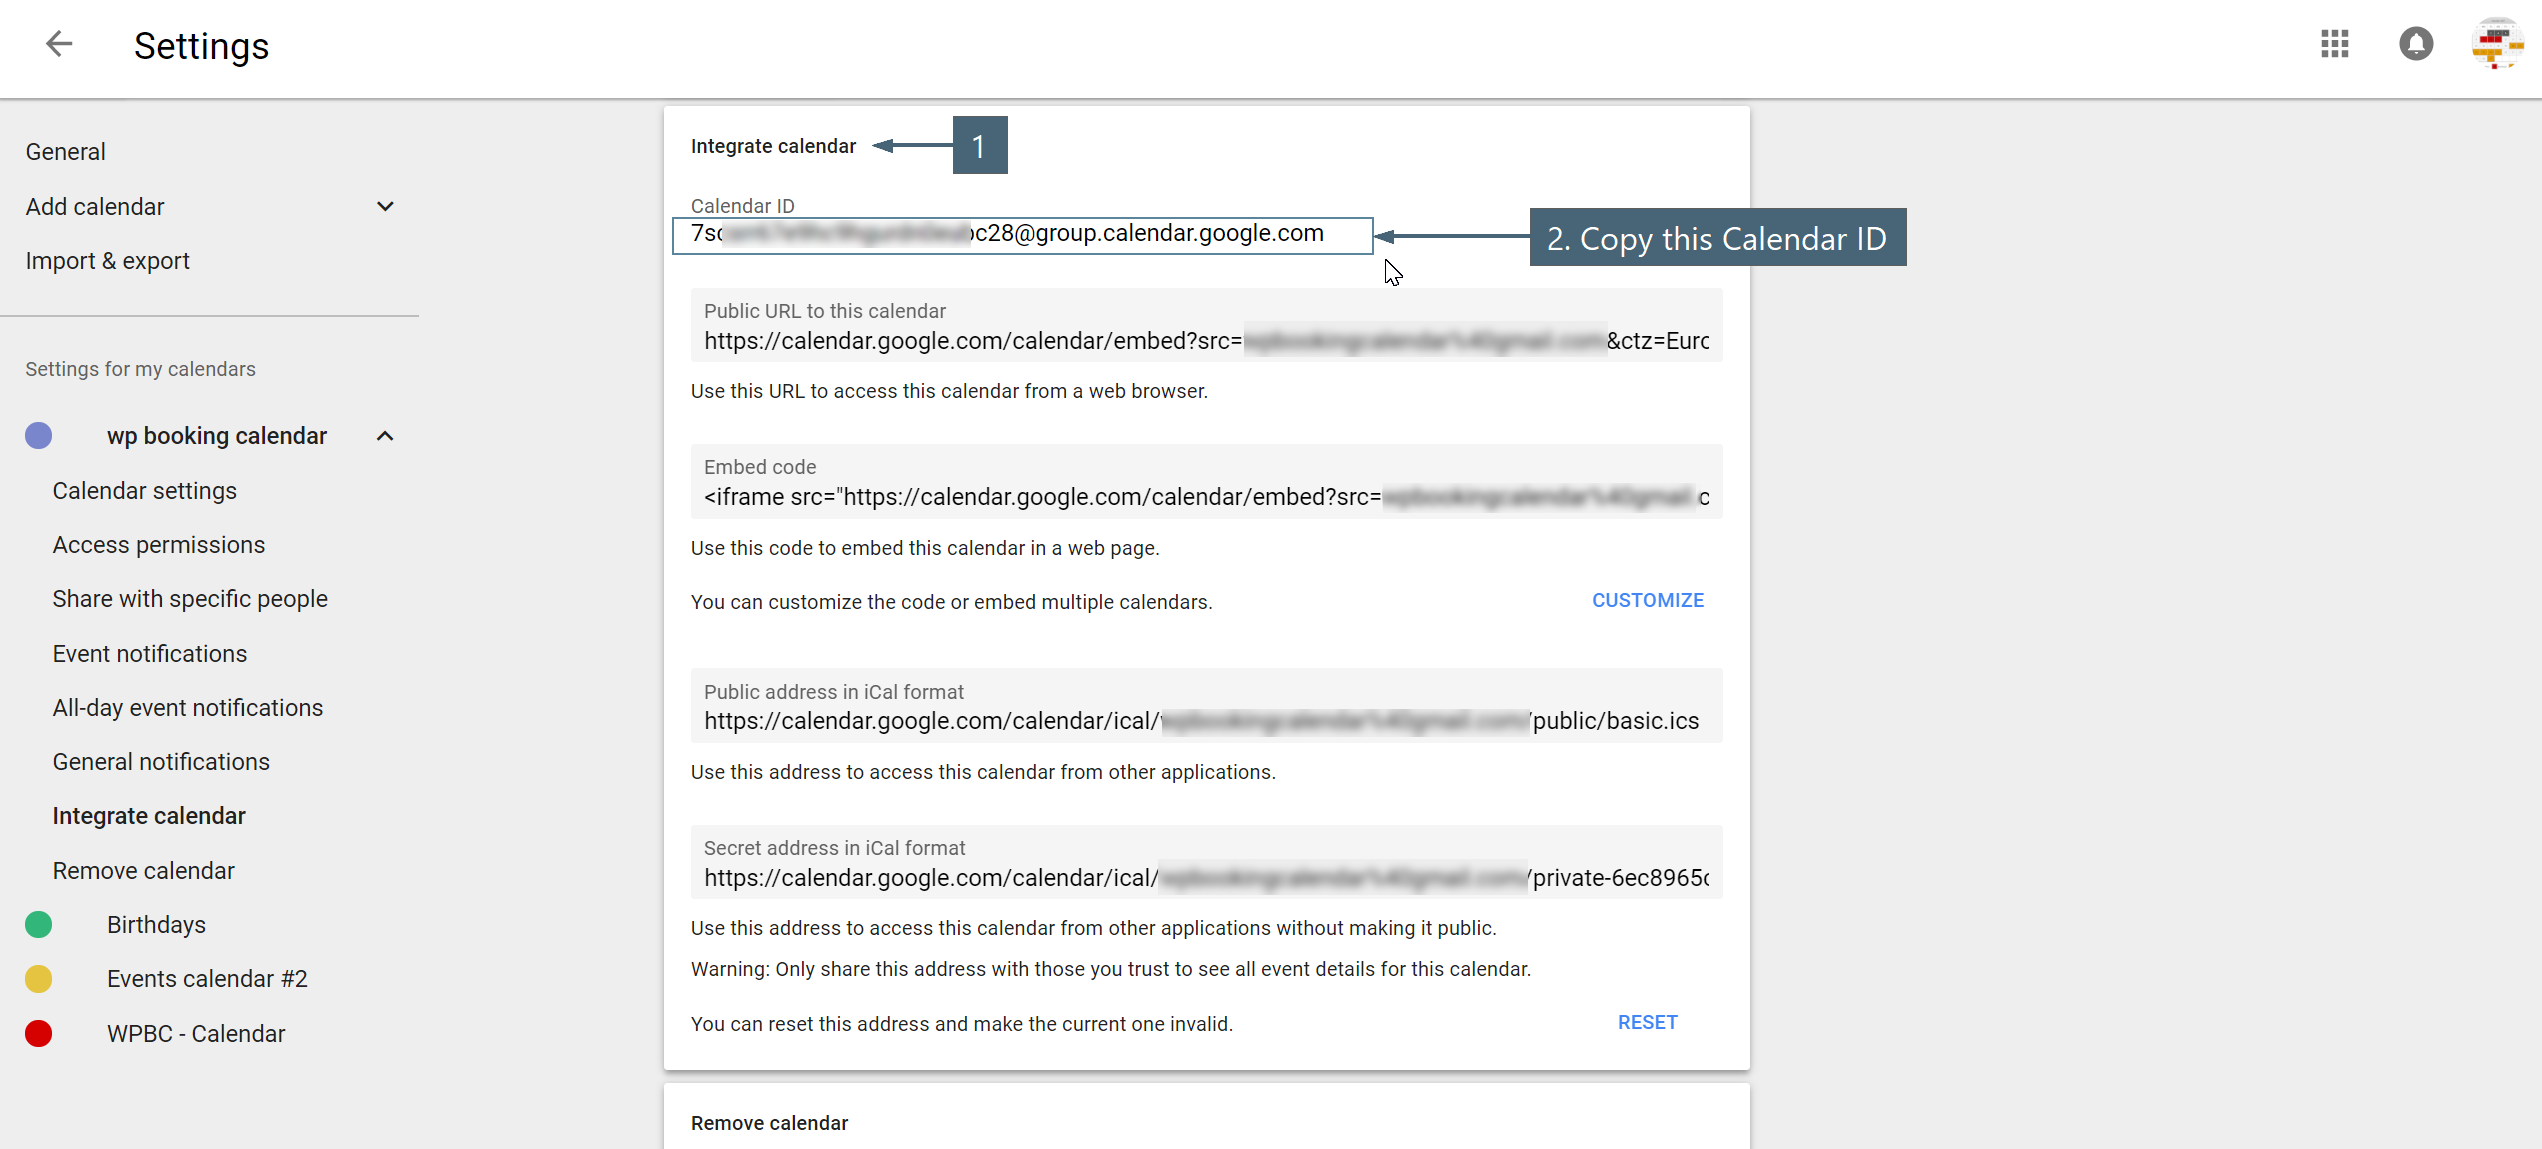
04. Test Import of Google Calendar Events:
- Open your WordPress admin panel and Navigate to Booking > Settings > Sync > Import Google Calendar Events page.
- Paste your Google API Key and Google Calendar ID into specific fields. Important! Please be sure that you do not paste any white spaces at the beginning or ending of API Key or Google Calendar ID. Save the changes.
In the paid versions of Booking Calendar you can assign at this page different Google Calendar ID for the different booking resources.

- Open Booking Listing page and switch to the "Actions toolbar", then click on "Import" button.

- In popup dialog configure your parameters (during first test import, please be sure that you selected time interval, where for sure exist your Google Calendar Events). And then click on Import button.

- You have to see your imported events. Reload the page to see them as bookings.

Customization of Booking Calendar
WordPress update 4.9 or newer.
Since update 4.9 of WordPress, its was updated interface of editing plugin files via WordPress admin panel.
1) Now, you can open WordPress admin panel, then
2) Open WordPress > Plugins > Editor menu
3) In the top right side for option "Select plugin to edit" select "Booking Calendar" plugin (please note, if you have several versions of Booking Calendar (for example, Booking Calendar Free version as deactivated version and paid version, so you will see both options there, and you need to select correct, activated version of your version of Booking Calendar) and click "Select" button
4) Now at right side you can see files and folders of plugin, you can select specific file to edit and make your customization,
after this click on Save changes button.
5) Clear browser cache and test it.
WordPress update 4.8 or older.
1) Open the WordPress Plugins menu page.
2) Click on "Edit" link under the "Booking Calendar" plugin.
3) On the right side of that page, please find specific file, like this:
booking/css/client.css
Or some other that you require. Click on that link.
You will be need to edit URL in your browser and specify directly, what file to edit.
One restriction. (Booking Calendar Free version have name of plugin folder "booking", paid versions of Booking Calendar can have different names. For example Booking Calendar Personal version can have name of folder like this: booking.personal.7.0 (etc). So you will be need to change in URL this folder appropriately.
For example, if you need to edit this file: ../{Booking Calendar Folder}/core/admin/page-email-trash.php
Then you need to edit URL to this:
https://your-server.com/wp-admin/plugin-editor.php?file=booking/core/admin/page-email-trash.php
Important part here this path: ?file=booking/core/admin/page-email-trash.php
And in case, if you use some paid version, you will be need to replace folder name from "booking" to "booking.personal.7.0" or some other.
4) Make edit of this file.
5) Then click on "Update file" button to save changes.
6) Clear browser cache and test it.
1) Currently there is no full API for using Booking Calendar plugin with other plugins or services.
Some hooks exist, but they does not documented well, yet. We are in process of improving this with future updates of plugin.
2) But still plugin have some useful functions and hooks for such purpose.
Please check this file ../{Booking Calendar Folder}/core/wpbc-dev-api.php
Here you can find some useful functions and hooks.
In new update 7.0 (or newer) exist new solid way of integration of your custom gateways.
This instruction is explain how to start work with integration your payment gateway into Booking Calendar Business Small or higher versions of update 7.0 or newer, based on exist payment gateway.
Let say that your new payment gateway have name: loc_payment.
1) You need to create new folder, like this:
../{Booking Calendar Folder}/inc/gateways/loc_payment/
then create new PHP file with following name:
../{Booking Calendar Folder}/inc/gateways/loc_payment/wpbc-gw-loc_payment.php
2) After this you can copy paste code from file
../{Booking Calendar Folder}/inc/gateways/stripe/wpbc-gw-stripe.php (or some other, which you better like)into your new file, and replace in content terms like "stripe" or "STRIPE" to "loc_payment" or "LOC_PAYMENT" accordingly.
3) Then check your code relative comments in this new file and configure your payment form and settings, relative to API and help info from website of your new payment gateway.
4) Additionally you need to add one new hook for ability to load the new payment gateway
// General API for Adding new gateways:
function add_my_gateway( $gateway ){ return $gateway . ',gateway_ID'; }
add_filter( 'wpbc_gateways_original_id_list', 'add_my_gateway' );
In your case you need to have something like this:
function add_my_loc_payment( $gateway ){ return $gateway . ',loc_payment'; }
add_filter( 'wpbc_gateways_original_id_list', 'add_my_loc_payment' );
5) If your payment gateway have response functionality, so then you can check this file
../{Booking Calendar Folder}/inc/gateways/stripe/stripe-charge.php and create similar file in your payment gateway folder.
1. Please read what type of shortcodes you are want to insert here
2. Open for edit your theme (PHP) file. For example: single.php.
3. Insert this code for showing booking form
<?php echo do_shortcode("[booking type=1 nummonths=1]"); ?>where instead of this shortcode: [booking type=1 nummonths=1], can be any other shortcode from the point #1.
4. save the changes in the PHP file.
If you need to show or hide some form fields in the booking form, depend from the selected option in some selectbox, you can make it with JavaScript customization.
For example, if you need to show additional fields for entering "First and Last Names" of the each visitor, depend from the selected number of this visitors, then you can have this customization in your booking form at the Booking > Settings > Fields page:
<p>Adults:  [select visitors class:visitors_selection "1" "2" "3" "4"] </p>
<p>First Name (required):<br />[text* name] </p>
<p>Last Name (required):<br />[text* secondname] </p>
<p>Email (required):<br />[email* email] </p>
<div class="visitors_selection_div v_num2 v_num3 v_num4" style="display:none;">
<p>First Name of 2nd visitor:<br />[text* name_2nd] </p>
<p>Last Name of 2nd visitor:<br />[text* secondname_2nd] </p>
</div>
<div class="visitors_selection_div v_num3 v_num4" style="display:none;">
<p>First Name of 3rd visitor:<br />[text* name_3rd] </p>
<p>Last Name of 3rd visitor:<br />[text* secondname_3rd] </p>
</div>
<div class="visitors_selection_div v_num4" style="display:none;">
<p>First Name of 4th visitor:<br />[text* name_4th] </p>
<p>Last Name of 4th visitor:<br />[text* secondname_4th]</p>
</div>
<script type="text/javascript">
jQuery('.visitors_selection').on('change', function() {
var visitors_num = jQuery(this).find(":selected").val();
jQuery('.visitors_selection_div').hide();
jQuery('.visitors_selection_div.v_num' + visitors_num ).show();
});
</script>
Description of this code:
We are having 3 additional DIV elemtns, where exist fields shortcodes for entering First and Last names of visitors. All these DIV elements does not visible for the visitors
style="display:none;".
We attach JavaScript function for selection of the visitors number:
jQuery('.visitors_selection').on('change', function() {Then we get the number of selected visitors:
var visitors_num = jQuery(this).find(":selected").val();Hide by default all our additional DIV elements:
jQuery('.visitors_selection_div').hide();And show DIV elements, that fit to our number of selected visitors:
jQuery('.visitors_selection_div.v_num' + visitors_num ).show();The trick here in how we apply CSS CLASSes to the DIV elements structure.
If you want to make several steps for reservation process, so then you need to customize your booking form at Booking > Settings > Fields page.
Exmaple #1
Your customization have to look like this (Please take your attention to the bold code, which is make all this trick)
<div class="bk_calendar_step">
[calendar]
<a href="javascript:bk_calendar_step_click();">Continue to step 2</a>
</div>
<div class="bk_form_step" style="display:none;">
<div style="text-align:left">
<a href="javascript:bk_form_step_click();">Back to step 1</a>
<p>First Name (required):<br />  [text* name] </p>
<p>Last Name (required):<br />  [text* secondname] </p>
<p>Email (required):<br />  [email* email] </p>
<p>Phone:<br />  [text phone] </p>
<p>Details:<br /> [textarea details] </p>
<p>[submit "Send"]</p>
</div>
</div>
<script type="text/javascript">
function bk_calendar_step_click(){
jQuery('.bk_calendar_step' ).css({'display':'none'});
jQuery('.bk_form_step' ).css({'display':'block'});
}
function bk_form_step_click(){
jQuery('.bk_calendar_step' ).css({'display':'block'});
jQuery('.bk_form_step' ).css({'display':'none'});
}
</script>
Exmaple #2
This example of the booking form customization show the form fields and calendar in the "1st step" and at the second step show "confirmation" info about entering data by visitor. Please note, using this form template, you need to insert the booking shortcode into the separate pages only, if you insert the several booking forms into one page, then its possible some issues. Also in this customization possible issues of not showing "1st step", if visitor enter some wrong data (for example into email), or skip some required fields and press the "Send" button, but the warnings about this fields are showing in the first step. And its means that visitor need to click on "Back to 1st step" button.
<div class="bk_calendar_step">
[calendar]
<p class="wpbc_first_name">First Name (required):<br />[text* name]<span class="wpbc_label" style="display:none;">First Name</span></p>
<p class="wpbc_last_name">Last Name (required):<br />[text* secondname]<span class="wpbc_label" style="display:none;">Last Name</span></p>
<p class="wpbc_email">Email (required):<br />[email* email]<span class="wpbc_label" style="display:none;">Email</span></p>
<p class="wpbc_phone">Phone:<br />[text phone]<span class="wpbc_label" style="display:none;">Phone</span></p>
<p><span class="wpbc_adults">Adults:  [select visitors class:span1 "1" "2" "3" "4"]<span class="wpbc_label" style="display:none;">Adults</span></span> <span  class="wpbc_children">Children: [select children class:span1 "0" "1" "2" "3"]<span class="wpbc_label" style="display:none;">Children</span></span></p>
<p class="wpbc_details">Details:<br /> [textarea details]<span class="wpbc_label" style="display:none;">Details</span></p>
<hr />
<a href="javascript:void(0)" onclick="javascript:bk_calendar_step_click();" class="btn">Continue to step 2</a>
</div>
<div class="bk_form_step" style="display:none;clear:both;">
<p>[captcha]</p>
<p><strong>Booking data:</strong></p>
<p><strong>[cost_hint]</strong> - cost of the booking </p>
<p><strong>[selected_timedates_hint]</strong> - dates for booking</p>
<div class="wpbc_booking_data_container"></div>
<hr/>
<p>[checkbox* term_and_condition use_label_element "I Accept term and conditions"] </p>
<div style="text-align:right;"><a href="javascript:void(0)" onclick="javascript:bk_form_step_click();" class="btn" style="margin:2px 15px 0;float:left;">Back to step 1</a> [submit class:btn "Send"]</div>
</div>
<script type="text/javascript">
function bk_calendar_step_click(){
var booking_data = '';
booking_data +=  jQuery(".wpbc_first_name .wpbc_label").html() +': <span class="fieldvalue"><strong>' + jQuery(".wpbc_first_name input").val() + '</strong></span><br/> ';
booking_data +=  jQuery(".wpbc_last_name .wpbc_label").html() + ': <span class="fieldvalue"><strong>' + jQuery(".wpbc_last_name input").val() + '</strong></span><br/> ';
booking_data +=  jQuery(".wpbc_email .wpbc_label").html() + ': <span class="fieldvalue"><strong>' + jQuery(".wpbc_email input").val() + '</strong></span><br/> ';
booking_data +=  jQuery(".wpbc_phone .wpbc_label").html() + ': <span class="fieldvalue"><strong>' + jQuery(".wpbc_phone input").val() + '</strong></span><br/> ';
booking_data +=  jQuery(".wpbc_adults .wpbc_label").html() + ': <span class="fieldvalue"><strong>' + jQuery(".wpbc_adults select option:selected").text() + '</strong></span><br/> ';
booking_data +=  jQuery(".wpbc_children .wpbc_label").html() + ': <span class="fieldvalue"><strong>' + jQuery(".wpbc_children select option:selected").text() + '</strong></span><br/> ';
booking_data +=  jQuery(".wpbc_details .wpbc_label").html() + ': <span class="fieldvalue"><strong>' + jQuery(".wpbc_details textarea").val() + '</strong></span><br/> ';
jQuery(".wpbc_booking_data_container" ).html( booking_data );
jQuery(".bk_calendar_step" ).css({"display":"none"});
jQuery(".bk_form_step" ).css({"display":"block"});
makeScroll('.bk_form_step');
}
function bk_form_step_click(){
jQuery(".bk_calendar_step" ).css({"display":"block"});
jQuery(".bk_form_step" ).css({"display":"none"});
}
</script>
Exmaple #3
This example of booking form have 5 steps procedure with showing summary info about entering booking form fields and selected date(s) at final step. Also this configuration check about any errors, and show step with specific error, before submitting the booking.
<div class="wpbc_steps wpbc_step_1">
<h2>Step 1/5</h2>
[calendar]
<hr/>
<a href="javascript:void(0)" onclick="javascript:wpbc_to_step(2);" class="btn">Continue to step 2</a>
</div>
<div class="wpbc_steps wpbc_step_2" style="display:none;clear:both;">
<h2>Step 2/5</h2>
<p>First Name (required):<br />[text* name] </p>
<p>Last Name (required):<br />[text* secondname] </p>
<hr/>
<a href="javascript:void(0)" onclick="javascript:wpbc_to_step(1);" class="btn">Back to step 1</a>
<a href="javascript:void(0)" onclick="javascript:wpbc_to_step(3);" class="btn">Continue to step 3</a>
</div>
<div class="wpbc_steps wpbc_step_3" style="display:none;clear:both;">
<h2>Step 3/5</h2>
<p>Email (required):<br />[email* email] </p>
<p>Phone:<br />[text phone] </p>
<hr/>
<a href="javascript:void(0)" onclick="javascript:wpbc_to_step(2);" class="btn">Back to step 2</a>
<a href="javascript:void(0)" onclick="javascript:wpbc_to_step(4);" class="btn">Continue to step 4</a>
</div>
<div class="wpbc_steps wpbc_step_4" style="display:none;clear:both;">
<h2>Step 4/5</h2>
<p>Adults:  [select visitors class:span1 "1" "2" "3" "4"] Children: [select children class:span1 "0" "1" "2" "3"]</p>
<p>Details:<br /> [textarea details] </p>
<hr/>
<a href="javascript:void(0)" onclick="javascript:wpbc_to_step(3);" class="btn">Back to step 3</a>
<a href="javascript:void(0)" onclick="javascript:wpbc_to_step(5);" class="btn">Continue to step 5</a>
</div>
<div class="wpbc_steps wpbc_step_5" style="display:none;clear:both;">
<h2>Step 5/5</h2>
<h3>Summary</h3>
<div class="wpbc_summary">
<strong>Dates</strong>:<span class="fieldvalue dates"></span><br/>
<strong>First Name</strong>:<span class="fieldvalue name"></span><br/>
<strong>Last Name</strong>:<span class="fieldvalue secondname"></span><br/>
<strong>Email</strong>:<span class="fieldvalue email"></span><br/>
<strong>Phone</strong>:<span class="fieldvalue phone"></span><br/>
<strong>Adults</strong>:<span class="fieldvalue visitors"></span><br/>
<strong>Children</strong>:<span class="fieldvalue children"></span><br/>
<strong>Details</strong>:<br /><span class="fieldvalue details"></span>
</div>
<hr/>
<p>[checkbox* term_and_condition use_label_element "I Accept term and conditions"] </p>
<p>[captcha]</p>
<hr/>
<a href="javascript:void(0)" onclick="javascript:wpbc_to_step(4);" class="btn">Back to step 4</a>
[submit class:btn "Send"]
</div>
<script type="text/javascript">
// Show next/prior steps
function wpbc_to_step( step_num ){
jQuery(".wpbc_steps" ).hide();
jQuery(".wpbc_step_" + step_num ).show();
wpbc_show_summary( step_num );
}
// Show Summary
function wpbc_show_summary( step_num ){
if ( step_num == 5 ) {
var bk_type = jQuery( "input[name^='bk_type']" ).val();
jQuery('.fieldvalue.dates').html( wpbc_get_selected_dates() );
jQuery('.fieldvalue.name').html( jQuery( "input[name='name"+bk_type+"']" ).val() );
jQuery('.fieldvalue.secondname').html( jQuery( "input[name='secondname"+bk_type+"']" ).val() );
jQuery('.fieldvalue.email').html( jQuery( "input[name='email"+bk_type+"']" ).val() );
jQuery('.fieldvalue.phone').html( jQuery( "input[name='phone"+bk_type+"']" ).val() );
jQuery('.fieldvalue.visitors').html( jQuery( "select[name='visitors"+bk_type+"']" ).val() );
jQuery('.fieldvalue.children').html( jQuery( "select[name='children"+bk_type+"']" ).val() );
jQuery('.fieldvalue.details').html( jQuery( "textarea[name='details"+bk_type+"']" ).val() );
}
}
// Get selected dates
function wpbc_get_selected_dates() {
var bk_type = jQuery( "input[name^='bk_type']" ).val();
var inst = jQuery.datepick._getInst(document.getElementById('calendar_booking'+bk_type));
var d_check_in = inst.dates[0];
var d_check_out = inst.dates[ (inst.dates.length - 1) ];
var show_check_in = jQuery.datepick.formatDate('mm/dd/yy'
, d_check_in
, jQuery.datepick._getFormatConfig(inst)
);
var show_check_out = jQuery.datepick.formatDate('mm/dd/yy'
, d_check_out
, jQuery.datepick._getFormatConfig(inst)
);
if ( show_check_in != show_check_out )
return show_check_in + ' - ' + show_check_out;
else
return show_check_in;
}
jQuery(document).ready(function(){
jQuery(".wpbc_steps" ).hide();
jQuery(".wpbc_step_1" ).show();
});
jQuery( ".booking_form_div input[type='button']" ).on( "click", function() {
//Catch  Submit event
jQuery('.wpdev-help-message.alert' ).each(function(){
if ( jQuery(this).css('display') != 'none') {
jQuery('.wpbc_steps').hide();
jQuery(this).parents('.wpbc_steps').show();
}
});
});
</script>
This customizations is available for the versions 4.0.2 or older.
Inside of the versions 4.1 or newer you can use the special shortcode for the insertion of the booking resource selections into the page or post. Please read more how to insert and configure the booking shortcode into the post or page here.
Firstly you need to open file of your actual theme, where you want to show this selection (For example: if you want to show it at pages, so then you need t open page.php file).
Then you need to add to specific place of this file next code:
<?php if ( strpos($_SERVER['REQUEST_URI'],'/bookingpage/') !==false ) { ?>
<label for="calendar_type">Type of booking:</label>
<select name="active_booking_form" onchange="jQuery('.bk_forms').css('display', 'none');
document.getElementById(this.value).style.display='block';" >
<option selected="selected" value="select">Please Select</option>
<?php global $wpdb;
$types_list = $wpdb->get_results( "SELECT booking_type_id as id, title FROM ".$wpdb->prefix ."bookingtypes" );
foreach ($types_list as $tl) { ?>
<option value="<?php echo $tl->id; ?>"><?php echo $tl->title; ?></option>
<?php } ?>
</select></p>
<p><?php foreach ($types_list as $tl) { ?>
<div class="bk_forms" id="<?php echo $tl->id; ?>" style="display: none;"><?php do_action('wpdev_bk_add_form', $tl->id, 1); ?></div>
<?php } ?>
<?php } ?>
At this example, this line
<?php if ( strpos($_SERVER['REQUEST_URI'],'/bookingpage/') !==false ) { ?>
is condition to showing the selection of form only at the specific page. In this case its page, which have term in URL, like this: 'bookingpage'
You can check this example at this page.
You can use the code like this for opening your booking form in popup (modal window):
<a href="javascript:void(0)" onclick="javascript:jQuery('.bookingFormModal').modal('show');" class="btn button">Booking form in popup window</a> </p>
<div class="wpdevelop">
<div class="modal bookingFormModal" tabindex="-1" role="dialog" style="display:none;z-index:9999999;">
<div class="modal-dialog modal-lg" role="document">
<div class="modal-content">
<div class="modal-header"><button type="button" class="close" data-dismiss="modal" aria-label="Close"><span aria-hidden="true">×</span></button></p>
<h4 class="modal-title">Booking Form</h4>
</div>
<div class="modal-body"> [booking type=1]</div>
</div>
</div>
</div>
</div>
<style type="text/css"> .wpdevelop .modal { overflow-y: scroll; } </style>
<p>
where [booking type=1] - shortcode for your booking form.
Probably additionally you will be need to customize some CSS classes and CSS styles relative to your actual theme.
In old versions of Booking Calendar (prior update 7.0 ) please use this code:
<a class="btn button">Booking form in popup window</a></p>
<div class="wpdevbk">
<div class="modal bookingFormModal" style="display: none; width: 700px !important; height: 1000px !important;">
<div class="modal-header">
<a class="close" data-dismiss="modal">& #10006;</a></p>
<h3 style="margin-top: -27px;">Booking Form</h3>
</div>
<div class="modal-body">[booking type=4 nummonths=2]</div>
</div>
</div>
<p>
where [booking type=4 nummonths=2] - shortcode for your booking form.
Probably additionally you will be need to customize some CSS classes and CSS styles relative to your actual theme.
This customization will open booking form in modal window, after visitor clicked on date in calendar.
Preparation:
- You need to have only one booking form on one specific visible page. This customization does not support several booking forms on the same page.
- You need to activate "Single day" selection mode at the General Booking Settings page in "Calendar" section
- Your theme or some other plugin require do not use any type of Bootstrap library. Otherwise its can be overwriting, and possible issues.
- If you are using Booking Calendar version update 5.4.3 or older, please make this small customization:
Please open this file ../{Booking Calendar Folder}/js/client.js
then find this code:
if(typeof( selectDayPro ) == 'function') {selectDayPro( date, bk_type);}
and replace it to this code:
if(typeof( selectDayPro ) == 'function') {selectDayPro( date, bk_type);}
jQuery( ".booking_form_div" ).trigger( "date_selected" , [ bk_type, date ] );
Customization:
Please open the Booking > Settings > Fields page, and make customization of your booking form in a way like this:
[calendar]
<div class="modal bookingFormModal"
style="display:none;width: 600px !important;height: 950px !important;">
<div class="modal-header">
<a class="close" data-dismiss="modal">& #10006;</a>
<h3 style="margin-top:-27px;">Booking Form</h3>
</div>
<div class="modal-body">
<!-- Content of booking form -->
<div class="form-hints">
Selected Date and Times: [check_in_date_hint]   [start_time_hint] - [end_time_hint]<br>
Total cost: [cost_hint]<br/><br/>
</div>
<p>Select Times:<br />[select* rangetime multiple "10:00 AM - 12:00 PM@@10:00 - 12:00" "12:00 PM - 02:00 PM@@12:00 - 14:00" "02:00 PM - 04:00 PM@@14:00 - 16:00" "04:00 PM - 06:00 PM@@16:00 - 18:00" "06:00 PM - 08:00 PM@@18:00 - 20:00"]</p>
<p>First Name (required):<br />[text* name] </p>
<p>Last Name (required):<br />[text* secondname] </p>
<p>Email (required):<br />[email* email] </p>
<p>Phone:<br />[text phone] </p>
<p>Adults:  [select visitors class:span1 "1" "2" "3" "4"] Children: [select children class:span1 "0" "1" "2" "3"]</p>
<p>Details:<br /> [textarea details] </p>
<p>[checkbox* term_and_condition use_label_element "I Accept term and conditions"] </p>
<p>[captcha]</p>
<hr/>
<div>
[submit class:btn "Send"]
<a href="javascript:void(0)" style="float: right;margin: 2px 20px;" onclick="javascript:jQuery('.bookingFormModal').modal('hide');" class="btn">Close</a>
</div>
<!-- End Content of booking form -->
</div>
</div>
<script type="text/javascript">
jQuery( ".booking_form_div" ).on('date_selected', function(event, bk_type, date) {
jQuery('.bookingFormModal').modal("show");
});
</script>
Update the booking form, and test it at the front-end.
Please note, starting from this line:
<!-- Content of booking form -->
to this line
<!-- End Content of booking form -->
is going on your booking form customization. So you can insert or remove your booking form shortcodes.
This customization, was made for the Booking Calendar Business Medium version, so here is using some shortcodes (like [cost_hint], [check_in_date_hint], [start_time_hint], [end_time_hint], [select rangetime ...]), that can be unavailable in lower versions.
P.S. One additional little fix. Please remove empty space (second symbol) after & in this code "& #10006;" at the booking form. Its will show correctly "x" symbol in the top of modal form.
Its possible to make a trick for scrolling months in several calendars at the same page by clicking on "external links".
Its means that you will have 2 external links (do not inside of calendars for scrolling months forward or backward).
Example:
<a class="button" onclick="jQuery('div.hasDatepick').each(function( index ) { jQuery.datepick._adjustDate(this, -1, 'M'); });" href="javascript:void(0)">Previous Month in all calendars</a> - <a class="button" onclick="jQuery('div.hasDatepick').each(function( index ) { jQuery.datepick._adjustDate(this, +1, 'M'); });" href="javascript:void(0)">Next Month in all calendars</a></p>
<div class="clear"></div>
<div style="float:left;width:45%;margin-right:5%;">[booking type=3 form_type='standard' nummonths=1]</div>
<div style="float:left;width:45%;margin-right:5%;">[booking type=4 form_type='standard' nummonths=1]</div>
<div class="clear"></div>
<p>
P.S. Please read how manually to configure Booking Calendar shortcodes here.
This feature is available only at Premium Plus, Hotel Edition versions. Using this feature is require creation of new additional booking form customization, where will be inserted several calendars.
Example, of replacement standard [calendar] shortcode at the form fields customization page for activation of this feature:
<div style="float:left;margin:10px;">[calendar]</div>
<div style="float:left;margin:10px;">[calendar id=2]</div>
<div style="float:left;margin:10px;">[calendar id=3]</div>
Where [calendar] - Default calendar (You are select this resource at popup, when insert it into post/page);
[calendar id=2] - Calendar of resource ID=2;
[calendar id=3] - Calendar of resource ID=3
In the versions 4.1.6, 5.0, 5.0.1 is exist issue with this feature. Version update 5.0.2 working fine.
In the search availability form possible to use additional parameters for searching. For example searching by specific location or some other attributes.
How to configure it?
"Custom fields".
You can use the "custom fields" in the posts or pages, were you inserted shortcode for booking form.
One general rule for the "custom fields" - each custom field must start from "booking_" term.
For example, if you wan to search by City, then you need to make this configuration:
1) In the search form (at the Booking > Settings > Search page), you can use this selectbox configuration:
<label>City:</label>
<select id="booking_city" name="booking_city">
<option value="">Any</option>
<option value="Salernes">Salernes</option>
<option value="Barjols">Barjols</option>
<option value="Lorgues">Lorgues</option>
</select>
2) Then at the post or page, where you inserted booking form, you need to add new "custom field" with name "booking_city" and value (for example): "Lorgues".
In the same way you can add new additional parameter(s).
For example:
<label>Pool:</label>
<select id="booking_pool" name="booking_pool">
<option value="">Any</option>
<option value="1">Yes</option>
<option value="0">No</option>
</select>
And of course in the page or post you need to create custom field: "booking_pool" with value "1" or "0"
General rules.
If you are having additional parameters, like this
- property_ab (this is some parameter)
- property_ac (number of beds)
- property_ad (square meters)
- ... etc...
you need to have parameters in format, where names of the custom fields starts from "booking_" terms:
- booking_property_ab (this is some parameter)
- booking_property_ac (number of beds)
- booking_property_ad (square meters)
Then inside of the search form you can have this selections:
Number of beds:
<select id="booking_property_ac" name="booking_property_ac">
<option value="1">1</option>
<option value="2">2</option>
</select>
And for the posts or pages you can use custom fields with names "booking_property_XX", where XX = {ab | ac | ad}.
Tags
You can use "tags" in the posts or pages, where you are inserted the booking form for the specific booking resource.
In the search form you are need to use this keyword:
[search_tag] - search inside of posts/pages, which are have this tag.
Please note, its text field, so your visitors need manually to enter the tag for the searching.
Trick
Its also possible to customize this element as selectbox instead of the text field. You will be need to replace the [search_tag] shortcode to this HTML element:
<select id="booking_search_tag" name="tag">
<option value="">Any</option>
<option value="room">Room</option>
<option value="apartment">Apartment</option>
</select>
where "<option value="room">Room</option>" - list of options to select; "room" its value of the tag, and "Room" - its label, which is showing for the visitors....
Please click at the "Reset cache" button at the bottom of the Booking > Settings > Search page, after you are finish configuration, before making tests at the client side. You can check this troubleshooting instruction, if you do not see search results: https://wpbookingcalendar.com/faq/no-search-results/
This JavaScript is possible to use before the booking shortcode, like this:
[booking type=1 form_type='standard' nummonths=1]in the edit post or edit page WordPress menu pages. In all examples below we will use that shortcode, but in your examples the parameters of the booking shortcode will be other, of course. Please read more how to insert and configure the booking shortcode into the post or page here.
Important! Please note, you be able to insert the JavaScript if you are logged in as admin user (the subscriber users have not rights to insert the JavaScript into the posts or pages) and turn the edit post content form into the "Text" mode instead of the "Visual" (you can activate this "Text tab" at the top right side of the edit post content form).
This customization is possible for the Business Small or higher versions of update 4.2 or newer.
Please note, for do not have any conflicts, please use this customizations, when you are insert into the post or page only single booking form. Its mean you are not insert the other booking shortcode into this page and do not have any booking widgets at this page.
Activating Single day selection mode.
Please use this code, for activating that type of days selection for the current booking form, if by default you are using the other type of days selections at the General Booking Settings page:
<script type="text/javascript">
bk_days_selection_mode = 'single';
</script>
[booking type=1 form_type='standard' nummonths=1]
Activating Multiple days selection mode.
Please use this code, for activating that type of days selection for the current booking form, if by default you are using the other type of days selections at the General Booking Settings page:
<script type="text/javascript">
bk_days_selection_mode = 'multiple';
</script>
[booking type=1 form_type='standard' nummonths=1]
Activating Range days selection as a FIXED number of days with 1 mouse click.
Please use this code, for activating that type of days selection for the current booking form, if by default you are using the other type of days selections at the General Booking Settings page:
<script type="text/javascript">
bk_days_selection_mode    = 'fixed';
bk_1click_mode_days_num   = 7;    // Number of days selection with 1 mouse click
bk_1click_mode_days_start = [-1]; // { -1 - Any | 0 - Su,  1 - Mo,  2 - Tu, 3 - We, 4 - Th, 5 - Fr, 6 - Sat }
</script>
[booking type=1 form_type='standard' nummonths=1]
In this example we are used 2 new variables: bk_1click_mode_days_num and bk_1click_mode_days_start.
bk_1click_mode_days_num - its number of days selection with 1 mouse click. You can assign number of days selections to this variable. For example for having 5 days selections, please use this code:
bk_1click_mode_days_num = 5;
bk_1click_mode_days_start - its array, where we can specify the start day of the range days selection.
If we are need to set the start day of range selection as any day of week, please use this code:
bk_1click_mode_days_start = [-1];
If we are need to set the specific start day of week selections or multiple days of week as start day for the range selections, please assign these values:
0 - Sunday,
1 - Monday,
2 - Tuesday,
3 - Wednesday,
4 - Thursday,
5 - Friday,
6 - Saturday.
So if you are need to set the start day of range selection as Saturday, please use this code:
bk_1click_mode_days_start = [6];
If you are need to set the start day of range selections as Monday and Friday, please use this code:
bk_1click_mode_days_start = [1,5];
This code
bk_1click_mode_days_start = [-1];
and this code:
bk_1click_mode_days_start = [0,1,2,3,4,5,6];
is equivalent.
Activating Range days selection as a DYNAMIC range of days with 2 mouse clicks.
Please use this code, for activating that type of days selection for the current booking form, if by default you are using the other type of days selections at the General Booking Settings page:
<script type="text/javascript">
bk_days_selection_mode    = 'dynamic';
bk_2clicks_mode_days_min       = 1;    // Min. Number of days selection with 2 mouse clicks
bk_2clicks_mode_days_max       = 10;   // Max. Number of days selection with 2 mouse clicks
bk_2clicks_mode_days_specific  = [];   // Example [5,7]
bk_2clicks_mode_days_start     = [-1]; // { -1 - Any | 0 - Su,  1 - Mo,  2 - Tu, 3 - We, 4 - Th, 5 - Fr, 6 - Sat }
</script>
[booking type=1 form_type='standard' nummonths=1]
In this example we are used 4 new variables: bk_2clicks_mode_days_min, bk_2clicks_mode_days_max, bk_2clicks_mode_days_specific and bk_2clicks_mode_days_start.
bk_2clicks_mode_days_min - Minimum number of days selection with 2 mouse clicks. You can assign number of days selections to this variable. For example for having minimum 7 days selections, please use this code:
bk_2clicks_mode_days_min = 7;
bk_2clicks_mode_days_max - Maximum number of days selection with 2 mouse clicks. You can assign specific number of days selections to this variable. For example for having maximum 14 days selections, please use this code:
bk_2clicks_mode_days_max = 14;
bk_2clicks_mode_days_specific - its array, where we can specify that is possible to select only specific number of days selection.
For having possibility to select any number of days, please use this code:
bk_2clicks_mode_days_specific = [];
For having possibility to select only weeks - 7 days, 14 days, 21 days... please use this code:
bk_2clicks_mode_days_specific = [7];
For having possibility to select only - 5, 7, 10, 14, 20, 21 days... please use this code:
bk_2clicks_mode_days_specific = [5,7];
bk_2clicks_mode_days_start - its array, where we can specify the start day of the range days selection.
If we are need to set the start day of range selection as any day of week, please use this code:
bk_2clicks_mode_days_start = [-1];
If we are need to set the specific start day of week selections or multiple days of week as start day for the range selections, please assign these values:
0 - Sunday,
1 - Monday,
2 - Tuesday,
3 - Wednesday,
4 - Thursday,
5 - Friday,
6 - Saturday.
So if you are need to set the start day of range selection as Saturday, please use this code:
bk_2clicks_mode_days_start = [6];
If you are need to set the start day of range selections as Monday and Friday, please use this code:
bk_2clicks_mode_days_start = [1,5];
This code
bk_2clicks_mode_days_start = [-1];
and this code:
bk_2clicks_mode_days_start = [0,1,2,3,4,5,6];
is equivalent.
CSS customization of plugin
Since update 4.2 of the Booking Calendar the calendar structure CSS file is located at the ../booking/css/calendar.css (please do not edit it or edit it very carefully). The calendar color skins are located in the ../booking/css/skins folder. Inside of these files (for better compatibility), please modify only following parameters:
* background , background-color, background-repeat, background-image, background-repeat, background-position
* border
* box-shadow, -moz-box-shadow, -webkit-box-shadow
* border-radius, -moz-border-radius, -webkit-border-radius
* color
* font-weight
* text-shadow
* text-transform
If you want to add new style.
Go to the folder “BOOKING_PLUGIN_PATH/css/skins/” and add new CSS file (the template you can get from this directory) to this directory. After this select this file at the general booking settings page and save settings.
If you want to customize exist skin.
Go to the folder “BOOKING_PLUGIN_PATH/css/skins/” open your file from this directory and customize it. After customization you need to select this style at the general booking settings page and save settings.
Important! Please note, if you will make upgrade of plugin to the new update, all plugin files is overwriting. Its means that your custom calendar skin also will be overwriting. That's why please backup your custom calendar skin before update and then restore it after update process.
Since new update 5.4 you do not need to backup/restore your custom calendar skins anymore. Just put your custom calendar skin to the special folder. Please save your own custom calendar skin to the /wp-content/uploads/wpbc_skins/ folder. You need to create this folder /wpbc_skins/ inside of your /wp-content/uploads/ folder, because this folder has not created automatically. Its will save your custom calendar skin, if you will make upgrade of plugin to new plugin update.
You can check this instruction how to edit CSS file from WordPress menu.
By default the "partially booked dates" (its means bookings for specific time-slot and available in Booking Calendar Business Medium or higher versions) is showing with small calendar icon at the bottom right side in each specific day cell, where exist bookings for specific time-slot. Because such bookings for time-slots can have pending or approved status, system also change background color for such dates.
Such workflow can be confused for some customers and sometimes need to show only calendar icon, but leave background color for such dates the same as for available dates. For having such view, you will be need to make some small fix in your calendar skin.
1) First of all, please check what calendar skin is active in your system. You can check it at the Booking > Settings General page in Calendar section. Please note, you calendar skin can be located at ../{Booking Calendar Folder}/css/skins/ or at ../{Booking Calendar Folder}/inc/skins/
2) Because you will be need to make fix, probably you need to create your own calendar skin in specific separate folder ( /wp-content/uploads/wpbc_skins/ ), its will save your customization during future updates of plugin. Please check how todo this here.
3) You will be need to add to the bottom of your calendar skin the CSS code for redefinition background color and text folor for such days.
For example for the "Premium Marine" calendar skin, this color can look like this:
.block_hints .block_time,
.datepick-inline .timespartly {
background-color: #789;
}
.datepick-inline .timespartly.date_available a{
color:#fff;
font-weight: 600;
text-shadow: 0 -1px 0 #333;
}
For other calendar skins, there will be different colors. In any way you can check what color you need to set there by checking section
/* A V A I L A B L E - BACKGROUND */
and
/* A V A I L A B L E - Text A */
in your active calendar skin.
After saving your calendar, skin (if you was creating your own calendar skin), please open the Booking > Settings General page and select for "Calendar Skin" your new calendar skin file. Then save changes.
Please do not forget to clear browser cache before testing these changes.
This feature possible to configure, only in the Booking Calendar Business Large or higher versions. Because only in these versions possible to set capacity per calendar, and to have different availability per days depend from number of bookings. Please check more about this here: https://wpbookingcalendar.com/overview/#capacity
1) Firstly please check this instruction how possible to configure your calendar skin by modification CSS file: https://wpbookingcalendar.com/faq/change-skin-and-colors/
2) Then you need to activate this Calendar Skin: "Multidays" at the Booking Settings General page in Calendar section.
This calendar skin have special CSS classes for ability to define different colors in calendar depend from capacity of booking resource (calendar) and number of bookings per specific date(s) (in other words based on availability on specific date). Probably you will be need to copy this calendar skin to separate folder, as explained in above instruction for future customization.
3) Each calendar day cells (in this calendar skin) have specific CSS classes like:
.reserved_days_count1
.reserved_days_count2
.reserved_days_count3
...
.reserved_days_count8
.reserved_days_count9
.reserved_days_count10
...
The number at the end of this class is explain the availability per specific days.
So in case (if you have capacity per booking resource as 10) you can configure in your calendar skin these colors for the different color for the different availability:
You can just add this code to the bottom of that calendar skin.
/* Partially availability: 1-7 */
.datepick-inline .reserved_days_count1,
.datepick-inline .reserved_days_count2,
.datepick-inline .reserved_days_count3,
.datepick-inline .reserved_days_count4,
.datepick-inline .reserved_days_count5,
.datepick-inline .reserved_days_count6,
.datepick-inline .reserved_days_count7{
background-color: #eb5;
color: #eeeeee;
text-shadow: 0px -1px 0px #888888;
}
/* Availability 8-10 */
.datepick-inline .reserved_days_count8,
.datepick-inline .reserved_days_count9,
.datepick-inline .reserved_days_count10 {
background-color: #1A5;
color: #eeeeee;
text-shadow: 0px -1px 0px #888888;
}
/* Approved */
.block_hints .date_approved.block_check_in_out,
.block_hints .block_booked,
.datepick-inline .date_approved,
td.timespartly.check_in_time.check_out_time.check_in_time_date2approve.check_out_time_date_approved div.check-in-div,
td.timespartly.check_in_time.check_out_time.check_out_time_date2approve.check_in_time_date_approved div.check-out-div {
background-color: #ee5933;
}
/* Pending */
.block_hints .date2approve.block_check_in_out,
.block_hints .block_pending,
.datepick-inline .date2approve,
td.timespartly.check_in_time.check_out_time.check_in_time_date_approved.check_out_time_date2approve div.check-in-div,
td.timespartly.check_in_time.check_out_time.check_out_time_date_approved.check_in_time_date2approve div.check-out-div {
background-color: #ee5933;
}
P.S. Please do not forget to clear browser cache before testing these changes.
You can define showing calendar months in several rows in "option" parameter of Booking Calendar shortcode, during inserting this shortcode into your page or post. Please read more about this configuration here.
This customization is only for the Booking Calendar Free version. In the paid versions, you can easily configure booking form fields and their style at the advanced form configuration at the Booking > Settings > Fields page.
Customization.
1) Please open this file ../wp-content/plugins/{Booking Calendar Folder}/css/client.css
and add to the bottom of that file this code:
.booking_form .control-label {
color: #FFF;
}
Of course instead of white color #FFF you can set some other.
2) In the same way possible to change the color of text inside of the text fields, text-area elements and selectboxes. You need to add to the bottom of this file ../wp-content/plugins/{Booking Calendar Folder}/css/client.css this code:
.booking_form_div select,
.booking_form_div textarea,
.booking_form_div input[type="text"] {
color: #FFF;
}
Again instead of white color #FFF you can set some other color.
Important! Please note after update of plugin to the newer version update, you will be need to make this fix again, because all Booking Calendar files will be overwritten.
How to edit plugin file in WordPress 4.9 or newer
Translations
You can download the original translations files from here. You can check instruction how to make or update translations files at this page.
Translations available in paid versions of Booking Calendar:
- English
- German [97% Completed]
- Spanish [97% Completed]
- Italian [97% Completed]
- Swedish [97% Completed]
- Danish [96% Completed]
- Portugal [96% Completed]
- Galician (Spanish) [95% Completed]
- Dutch [95% Completed]
- Finnish [95% Completed]
- Slovenian [95% Completed]
- Thai [95% Completed]
- Norwegian [92% Completed]
- Brazilian Portuguese [92% Completed]
- Hebrew [92% Completed]
- Hungarian [92% Completed]
- Ukrainian [92% Completed]
- Russian [96% Completed]
- Chinese [92% Completed]
- Chinese (Taiwan) [92% Completed]
- French [92% Completed]
- Polish [90% Completed]
- Greece [78% Completed]
- Czech [78% Completed]
- Slovak [78% Completed]
- Croatian [78% Completed]
- Turkish [78% Completed]
- Catalan [78% Completed]
- Bulgarian [78% Completed]
- Arabic [77% Completed]
- Belarussian [9% Completed]
On the Booking Listing page exist ability to change language (locale) of emails, that will send to visitor during approving or declining of the booking. But how to detect language/locale of webpage, from where visitor submit the booking.
Here is instruction how to do this.
Please open the Booking > Settings > Fields page and add to the booking form this shortcode and JavaScript code:
</p>
<div style="display:none;"> Active Language: [text active_language class:wpbc_lang_field]</div>
<p><script type="text/javascript">
jQuery(document).ready(function(){
jQuery('.wpbc_lang_field').val( wpbc_active_locale );
});
</script>
Its will add to your booking form new field [active_language] and JavaScript for auto-inserting active locale into this field. Please note, this field is not visible for visitors, because of this CSS: style="display:none;"
Also you will be need to add to the "Content of booking fields data" form (its at the bottom of Booking > Settings > Fields page) this shortcode:
<strong>Active Language</strong>:<span class="fieldvalue">[active_language]</span>
For showing this field at the Booking Listing page.
- Before making translation of wordpress plugin, you need to have Poedit program. You can download it from here. Its completly free.
- Start Poedit program.
- Select File -> New catalog from POT file from menu and select POT file for translation usually its inside of languages folder.
- Type description of your translation.
- Enter The name of PO file.
Name of file consist from 2 parts:
1st part its the filename of the plugin (in our situation its "booking"),
2nd part its the Locale (for Spanish translation: "es_ES").
So we will have name "booking-es_ES.po". - Save file to the "languages" folder of plugin.
- Make translation.
- If you find in translation "%s" symbol you should leave it at the same place as at original translation line.
- Please be sure that you do not set specific translation line as "Fuzzy". You can check it at the "Edit menu" - "Translation is fuzzy" (Ctrl + U)
- Save file after translation.
- If you make translation, you can send this translation files (*.po, *.mo) to info@wpbookingcalendar.com and we will add them to the next release of plugin. Thank you.
Paid versions of Booking Calendar support configuration in different languages of the booking form, email templates and some other text options in the settings . The active language of the booking form is depending from the active locale of the site.
Booking Calendar is supported WPML and qTranslate plugins for dynamic changing of website locale (language).
General Usage:
[lang=LOCALE] - start new translation section in specific language, where LOCALE - locale of the translation.
Example of English and French translation of "Thank you" message:
Thank you for your booking.[lang=fr_FR]Je vous remercie de votre reservation.-
Important! Please note, by default you need to have the English section and then divided by this shortcode [lang=LOCALE] sections in all other languages.
Of course you can have more than 2 language sections.
Example of configuration booking form in English and French languages at the Booking > Settings > Fields page:
[calendar]
First Name (required): [text* name]
Last Name (required): [text* secondname]
Email (required): [email* email]
Visitors: [select visitors "1" "2" "3" "4"]
Details: [textarea details]
[submit "Send"]
[lang=fr_FR]
[calendar]
Prénom (obligatoire): [text* name]
Deuxième prénom (requis) [text* secondname]
Email (obligatoire) [email* email]
Visiteurs : [select visitors "1" "2" "3" "4"]
Détails : [textarea details]
[submit "Envoyer"]
In the same way, you can configure the email templates on the Booking > Settings > Emails page and search form on the Booking > Settings > Search page, etc..
Troubleshooting
1) Firstly check SPAM / JUNK folder in your mail system.
2) Open Booking > Settings > Emails page and for each email template (switch tabs at toolbar) recheck that you have correct email addresses.
Sometimes mail servers block emails, if the address "From" different from the domain of website, from where this email was sending. Its not really depend from the Booking Calendar. So please open the Booking > Settings > Emails page and recheck that field "From" have the same email as your website domain.
For example: info@your-server.com and not like this your_email@gmail.com
where your-server.com its your website domain.
Also try to set for field "To" in the "New (admin)" email template the same email that you was used in field "From" at this email template page.
3) Also please be sure that you have activated specific email templates for sending at Booking > Settings > Emails page.
Check-box "Enable / Disable" must be checked at each email template, that you want to use.
4) Check that your PHP mail function is working correctly. You can open your login page and try to retry the password, then check if you received email.
5) This is most common reason of not receiving emails !!!
Try to install the WP Mail SMTP plugin which is 'sending emails via php' option and it can resolve that issue.
If you will have some issue with this plugin, try to install "post smtp" plugin or some other SMTP plugin. Otherwise, please contact support of specific SMTP plugin about correct configuration of settings specific SMTP plugin.
If your emails aren't being received by Gmail, Hotmal, Yahoo Mail accounts, here's information that should help you understand why this is happening.
Issue description
Here is typical situation:
The admin email for your booking system is a “yahoo.com” account.
Customers were receiving emails, if they had a “isp.com” account but not a: gmail.com, hotmail.com, yahoo.com.auReason
Those emails were rejected by hotmail/yahoo/gmail servers due to their new email policy.
Error logs are showing to refer below links :
https://support.google.com/mail/answer/2451690
https://help.yahoo.com/kb/SLN7253.html?impressions=trueSolution
If your WordPress is sending emails from some custom email address (for example like this: ‘username@orion-dse.fastwebservers.com.au’), then you needed to enable SMTP authentication with WordPress site so the emails would send from your yahoo/gmail/hotmail email address instead of custom email ( username@orion-dse.fastwebservers.com.au - cPanel default username). This have to fix this issue.You can fix this problem by installing the “Configure SMTP” WordPress plugin.
You can setup SMTP authentication through any WordPress smtp plugin.
Please refer https://www.youtube.com/watch?v=ZZPfkzEaJaQ
P.S. Thanks to dscottfl about this solution.
6) Please try to test sending of emails by creation of new bookings at front-end side of your website (do not test it from sending test emails at Booking > Settings > Emails page).
7) If the issue still will exist , please try reconfigure Subject and Content of the email template. Make it simpler. May be because of some server restrictions, you are having blocking of sending these emails.
8) Finally, please recheck your error.log and mail.log in your server configuration, about any relative errors.
If you having troubles with checking these files, please contact support of your hosting company about this.
1) Please recheck for any cache plugins, like "WP Super Cache" or "W3 Total Cache". If you are using someone, please deactivate it or add the exception to the pages with booking form and search form and search results for do not cache these pages.
2) Please recheck that you inserted into the content of separated posts or pages the booking forms (shortcode [booking ...]) for the parent (resource with some capacity) or single booking resources. If you had inserted the child resources, then these booking resources will not display in search results.
Please read more about configuration of booking resources here and about capacity concept here.
3) Please open the Booking > Settings > Search page and click on "Clear cache" button, you have to see the number of found pages with booking forms.
4) Please recheck how the search availability functionality is working depend from settings of different parameters.
After this you can test search form at front-end.
You can also be interesting in adding different additional parameters to the search form.
This issue is relative of showing the several booking calendars (booking forms) of the same booking resource at the same "visible" page. Its possible to show only one calendar (booking form) of the specific booking resource at one visible page. You will have no problems to show the calendars (booking forms) of the different booking resources at the same page.
At the Booking Calendar Free version is available only one default booking resource, so its mean that any calendars (booking forms) in this version is belong to the same booking resource. And thats why its not possible to show several booking calendars (booking forms) at the same visible page.
This info is relative to the several booking calendars (booking forms) inside of the content of the page or inside of the content of page and visible booking calendar widget (in this case you are need to deactivate the booking calendar widget, or add the exception of showing the widget at this page).
Its most probably that you are having some JavaScript error at that page. Please recheck your page for any JavaScript errors (usually for see what JavaScript error you have you need to press Ctrl + Shift + J for showing browser console) and try to fix them.
You can also try to deactivate one by one all your active plugins at the WordPress > Plugins menu. Then retest it again.
If its not help, please deactivate your active theme and active the default WordPress theme. And then retest it again. May be there exist some conflict with some active plugin or actual theme and just need to find the reason of that issue.
If you still will have this issue, please send the link to the page with booking form, where you are having an issue, we will check it then.
Issue
If you have the situation that calendar is not visible in your booking form but all other fields is visible.
And you are have JavaScript error, similar to this:
Error: jQuery("#calendar_booking" + bk_type).datepick is not a function
Source: .../wp-content/plugins/booking/js/wpdev.bk.js
Line: 161
Reason
So possible reason of this issue is loading of jQuery library 2 times in your site/
The loading process is next:
1) Firstly is loaded the standard jQuery (ver 1.7) from wordpress (and its fine):
<script type='text/javascript' src='.../wp-includes/js/jquery/jquery.js?ver=1.7.1'></script>
2) Then load the scripts of the Booking Calendar, where is defined all functions, including the datepick funcion.
3) Then your theme (or may be some other plugin) is load the jQuery again, (its possible that its some old version of jQuery, like ver. 1.5).
<script type="text/javascript" src="..../wp-content/themes/my_custom_theme/js/jquery.min.js"></script>
This load of the jQuery is overwrite previous load and we are get that error.
Solution.
Please open the header.php file of your theme and deactivate (comment), the loading of the jQuery, so you do not load it for the second time.
This issue is relative to the configuration of the DNS in your website.
Please try to reconfigure it or contact your administrator for fixing this issue.
Description of reason of the issue.
1) This error "0", can be because in your server configuration somewhere (probably in the WordPress > Settings > General page for the options "WordPress Address (URL)" or "Site Address (URL)") configured different Domain that you try to submit the booking.
For example, in Ajax URL its can be set as "https://www.yourserver.com/wp-admin/admin-ajax.php"
and you try to submit the booking from https://www.yourserver.com/bookings/ Or backward.
You can check it is by viewing the HTML code of your loaded page, in the section:
<!-- Booking Calendar Scripts -->
Because booking is sending from HTTP to HTTPS, we are having such type of error.
Please recheck your server configuration at the WordPress > Settings > General page as in above description, or in some other place, where you are set using HTTPS instead of HTTP protocol.
You need to use the same protocol in both ways. If you will have difficulty with searching where exactly you are having this issue, please contact your server administrator who make that configuration.
The same issue can be if you configured sever address with "www." But trying to submit booking from URL without "www." prefix in URL. Or backward.
2) Also please try to deactivate one by one all your active plugins at the WordPress > Plugins menu. Then retest it again.
If its not help, please deactivate your active theme and active the default WordPress theme. And then retest it again. May be there exist some conflict with some active plugin or actual theme and just need to find the reason of that issue.
If the previous solutions will not help, please recheck your error.log file from your server configuration (please contact your server administrator or support of the hosting company, if you will have troubles with searching of this file) to be sure in a reason of that issue.
This warning relative to the Booking Calendar MultiUser version.
You can see this warning, because your WordPress user was not activated as regular user in Booking Calendar (have not own booking admin panel) at Booking > Settings > Users page, and this user is not the super booking admin user.
By default the first user in your website, its Super booking admin user.
1) Please login to admin panel with this "first user".
It can be that currently you have logged in with administrator user, that have ID as 5 (or any other). But your WordPress website, also have other administrator users with ID, like 1 or 2. If true, so then you need to login with User with login ID = 1
After this you will see access to the booking admin panel. Then you can activate the booking admin panel for other WordPress users at the Booking > Settings > Users page.
2) In case, if your current user do not have access to the Booking > Settings > Users page, and you do not know login details of your first user, so you can make small customization for activating your actual user as super booking admin user.
You can make this fix.
Firstly please recheck ID of your user. You can open the WordPress > Users page, and then near specific user you can click on edit button, then in browser URL you will see parameter user_id
which will show Id of your user, let say that this ID of your current user is 3
So then, please make this fix.
Please open this file ../{Booking Calendar Folder}/inc/_mu/multiuser.php
( you can check how to edit files in WordPress menu in this article https://wpbookingcalendar.com/faq/how-edit-file-in-wp-menu/ )
then find this code:
$this->super_admin_id = array( $admin_id ); // ID of Super Administrators
and replace it to this code:
$this->super_admin_id = array( $admin_id , 3 ); // ID of Super Administrators
Firstly you need to check access to the wpdev-booking.php file. If booking plugin is installed to the https://www.myserver.com/wp-content/booking/wpdev-booking.php so copy that link to your browser and check access. Its have to show this error: Fatal error: Call to undefined function get_option(). If you see something like:Error 500 Internal Server Error, so then you need to set access to the wpdev-booking.php file. In most case you just need to set atribute to that file as 755 using your FTP client, sometimes is needed editing .htaccess file. So contact your administrator or check .htaccess file by yourself.
Sometimes wp-content and/or wp-content/plugins and/or wp-content/plugins/booking directories and/or file wp-content/plugins/booking/wpdev-booking.php had permissions set to 777. So its also can make this issue. Please change permissions on those directories and file to 755 and it have to work.
1) Firstly please open the Booking > Settings > Emails page and deactivate all email templates.
Then try to make new booking. If you will be able to make new booking, so then its means following:
Some severs can block sending emails and generate "500 Internal Error", when you send it to visitor from domain different from your website. You need to check, if this condition set in your server configuration.
- Please try to set in the field "From" instead of visitor email shortcode, your email (its at the Booking > Settings > Emails page). The same email that you set in the field "To".
- Sometimes mail servers block emails, if the address "From" different from the domain of website, from where this email was sending. Its not really depend from the Booking Calendar. So please open the Booking > Settings > Emails page and recheck that field "From", its have to the same as your website domain. For example: info@your-server.com and not like this your_email@gmail.com
Otherwise, please contact support of your hosting company about recheck conditions, when your server block sending of emails.
2) Such error can be because in your server configuration (probably at the WordPress > Settings > General page for the options "WordPress Address (URL)" or "Site Address (URL)") configured different Domain that you try to submit the booking
For example, in Ajax URL its can be set as "https://www.yourserver.com/wp-admin/admin-ajax.php"
and you try to submit the booking from https://www.yourserver.com/education/bookings/
Because booking is sending from HTTP to HTTPS, we are having such type of error.
Please recheck your server configuration at the Settings General page as in above description, or in some other place, where you are set using HTTPS instead of HTTP protocol.
You need to use the same protocol in both ways. If you will have difficulty with searching where exactly you are having this issue, please contact your server administrator who make that configuration.
The same issue can be if you configured sever address with "www." But trying to submit booking from URL without "www." prefix in URL. Or backward.
3) Also please try to deactivate one by one all your active plugins at the WordPress > Plugins menu. Then retest it again.
If its not help, please deactivate your active theme and active the default WordPress theme. And then retest it again. May be there exist some conflict with some active plugin or actual theme and just need to find the reason of that issue.
4) If the previous solutions will not help, please recheck your error.log file from your server configuration (please contact your server administrator or support of the hosting company, if you will have troubles with searching of this file) to be sure in a reason of that issue.
If you notice Booking > Settings General page is not saving, Suhosin (a security module in PHP) may be preventing the POST data from being saved. This issue can also be caused by servers with version PHP 5.3.9+ and servers running mod_security.
If enabled, Suhosin may need to be configured to increase its data submission limits. Changing Suhsoin settings differ from host to host so it’s usually better to consult with the provider than attempt it yourself, however some hosts allow you to change settings via php.ini, suhosin.ini, or .htaccess.
Commonly, the following vars will need changing:
memory_limit = 256M
max_execution_time = 120
post_max_size = 8M
upload_max_filesize = 8M
max_input_vars = 20480
post_max_size = 64M
suhosin.post.max_array_index_length = 1024
suhosin.post.max_totalname_length = 65535
suhosin.post.max_vars = 2048
suhosin.post.max_value_length = 1000000
suhosin.post.max_name_length = 256
suhosin.post.max_array_depth = 1000
suhosin.request.max_array_index_length = 1024
suhosin.request.max_totalname_length = 65535
suhosin.request.max_vars = 2048
suhosin.request.max_value_length = 1000000
suhosin.request.max_varname_length = 256
suhosin.request.max_array_depth = 1000
After saving you will need to restart the server for the changes to take effect. See https://www.hardened-php.net/suhosin/configuration.html for more information on Suhosin settings.
In shared hosting environments it may not be possible to edit php.ini, in which case you may be able to set the suhosin settings via .htaccess
It is still recommended however to consult your hosting providers documentation, or raise a ticket with them for assistance.
Please note, this workflow based on new update 7.0
If you using older version, please update it. For paid versions, you can request the new update of Booking Calendar on this page: https://wpbookingcalendar.com/request-update/
1) Reason of issue.
Such issue possible, if you previously have deleted some booking resources at Booking > Resources page.
And such deleted booking resources was having some bookings. So now you are having in Database such lost bookings.
2) How to fix it.
Please try to open this link:
https://server.com/wp-admin/admin.php?page=wpbc&wh_booking_datenext=1&wh_booking_dateprior=1&wh_booking_date=3&wh_trash=any&wh_modification_dateprior=1&wh_modification_date=3&wh_pay_status=all&view_mode=vm_listing&wh_booking_type
Since update 7.2.1 please use this link https://server.com/wp-admin/admin.php?page=wpbc&wh_booking_datenext=1&wh_booking_dateprior=1&wh_booking_date=3&wh_trash=any&wh_modification_dateprior=1&wh_modification_date=3&wh_pay_status=all&view_mode=vm_listing&wh_booking_type=-999
Just replace "server.com" to your website DNS in this URL.
The trick in this link having empty "&wh_booking_type" parameter. Its will show all pending bookings, even if such bookings belonging to the booking resources that have been deleted.
Now, when you will see all such bookings, you will see near some bookings label that "Resource does not exist"
So you can assign to such booking(s) new exist booking resource, by clicking on specific "assign booking resource" button near this booking,
or if you do not need such booking, then please delete completely (even from trash) such booking.
1) Please be sure that you have correctly configured "Content of booking fields data" form at the Booking > Settings > Form page.
For example, if you are having in the booking form configuration like this:
Last Name (required): [text* secondname]
so then at the "Content of booking fields data" form you need to have configuration like this:
Last Name: [secondname]
Please use shortcode generator at the right side of the Booking > Settings > Form page for the fast and correct creation of booking form fields.
2) Also in some old premium versions of Booking Calendar together with latest update of WordPress possible issue that all entering fields in booking form are blank.
In this case you need to update your version of booking calendar to latest update or rollback your WordPress version.
You can request the new update of Booking Calendar on this page.
After installing update, please make fully NEW bookings to test that booking details is saving correctly.
Kind Regards.
This error is appear because of wrong installation of plugin.
1) Please, open the General Booking Settings page and set this option "Delete booking data during uninstall", as unchecked, at the right side of page, otherwise your exist booking data will be delete during deactivation of plugin.
2) Then open the Plugins menu and press Deactivate link of Booking Calendar. Wait, for the message about: "plugin is deactivated successfully".
3) Then press activate link. Wait, until message will show up that plugin is activated successfully.
Now, you can test it again.
1) This issue can happens in Booking Calendar Business Small or higher versions, if this you have activated using "Check in/out times" (check more about this feature here) at the Booking > Settings General page and incorrectly configured "Check in/out times fields" (usually these fields are empty during this issue.
How to fix.
- You need to be sure that the check in time is older than check out time. For example: Check in: "14:00" and check out: "12:00"
- Or you can simply deactivate "Check in/out times" option, if you do not need to use change-over days.
2) Also this issue possible if you have incorrectly configured time(s) fields at the Booking > Settings > Form page.
You can try to remove any times fields from the Booking > Settings > Form page, or try to reset booking form to one default "Form templates" (you can select one predefined form template at the toolbar, and then click on "Both" button, its will reset your form. After this you can click on "Save changes" button to save these changes.
Otherwise, please use shortcode generator at the right side of the Booking > Settings > Fields page for the fast and correct creation of booking form fields.
3) Other workaround. We do not recommend todo this point, because dropping indexes (as in bellow instruction), will significant impact to speed of loading.
So for fixing this issue, please open the phpMyAdmin or similar tool for the working with DB
and execute this SQL command:
ALTER TABLE bookingdates DROP INDEX booking_id_dates
or this (depend from the prefix at your DB tables):
ALTER TABLE wp_bookingdates DROP INDEX booking_id_dates
1) Go to the general booking settings page and check ON use CAPTCHA check box and save a page.
2) If you use Standard (free) version skip this step, otherwise go to the form fields customization page add captcha shortcode to the customization form:
<p>[captcha]</p>
3) Check write permission at the folder YOUR_WORDPRES_SERVER/wp-content/plugins/booking/js/captcha/tmp/. This folder have to be write-able.
4) Check that your server was configured for using 2.0 GD library.
Reason.
The cause is that you do not have the version 2.0 GD library loaded in PHP which defines this function, which is used for the captcha in this plugin.
Checking
Use this PHP code to view what extensions you have loaded on your hosting account.
print_r(get_loaded_extensions());
print_r(var_dump(gd_info()));
Just create a text file with the these lines above in your public_html folder (or wherever your web root is), name it with a .php extension like "test.php" and then run it by using your web browser like "https://www.yourdomain.com/test.php "
This does not write correct HTML but will show you the info you need. (Just do a View/Source on your browser if you want a nicer looking format.) Look for text like "[some number] => gd". If you don't see this, you do NOT have the GD library loaded.
Next you want to look for the version number. Something like: ["GD Version"]=> string(27) "bundled (2.0.28 compatible)"
This needs to say version 2.0 or later.
If you do not see GD version 2.0, you must get your hosting provider to install or upgrade your system.
LEARN MORE:
Learn more about the GD library:
https://www.php.net/manual/en/ref.image.php
Learn more about this function:
https://www.php.net/manual/en/function.imagecreatetruecolor.php
5) If you are using Cache plugin (like "WP Super Cache" ), please deactivate it or add the exception to the page with booking form to do not cache this page.
4) Finally, please try to deactivate one by one all your active plugins at the WordPress > Plugins menu. Then retest it again.
If its not help, please deactivate your active theme and active the default WordPress theme. And then retest it again. May be there exist some conflict with some active plugin or actual theme and just need to find the reason of that issue.
If you are still will have this issue, please recheck the error.log in your server configurations to be sure in a reason of that issue.
Kind Regards.
Probably your actual theme or some active plugin is using the new version of jQuery 1.9 or 2.0, which is not support the "a.browser" property.
So for fixing this issue, please open this file: ../booking/lib/wpdev-booking-class.php
find this code:
function bc_enqueue_scripts() {
wp_enqueue_script('jquery');
// enqueue the jQuery by Default
if (class_exists('wpdev_bk_biz_s')) {
// Load the jQuery 1.7.1 if the them load the older jQuery and version of booking Calendar is BS or higher
global $wp_scripts;
if (  is_a( $wp_scripts, 'WP_Scripts' ) ) {
if (isset( $wp_scripts->registered['jquery'] )) {
$version = $wp_scripts->registered['jquery']->ver;
if ( version_compare( $version, '1.7.1', '<' ) ) {
wp_deregister_script('jquery');
wp_register_script('jquery', ("https://code.jquery.com/jquery-1.7.1.min.js"), false, '1.7.1');
//wp_register_script('jquery', ("https://code.jquery.com/jquery-latest.min.js"), false, false);
wp_enqueue_script('jquery');
}
}
}
}
}
and replace it to this code:
function bc_enqueue_scripts() {
wp_enqueue_script('jquery');
// enqueue the jQuery by Default
if (class_exists('wpdev_bk_biz_s')) {
// Load the jQuery 1.7.1 if the them load the older jQuery and version of booking Calendar is BS or higher
global $wp_scripts;
if (  is_a( $wp_scripts, 'WP_Scripts' ) ) {
if (isset( $wp_scripts->registered['jquery'] )) {
$version = $wp_scripts->registered['jquery']->ver;
if ( version_compare( $version, '1.7.1', '<' ) ) {
wp_deregister_script('jquery');
wp_register_script('jquery', ("https://code.jquery.com/jquery-1.7.1.min.js"), false, '1.7.1');
//wp_register_script('jquery', ("https://code.jquery.com/jquery-latest.min.js"), false, false);
wp_enqueue_script('jquery');
}
if ( version_compare( $version, '1.9', '>=' ) ) {
wp_register_script('jquerymigrate', ("https://code.jquery.com/jquery-migrate-1.0.0.js"), false, '1.0.0');
wp_enqueue_script('jquerymigrate');
}
}
}
}
}
Please open the Booking > Settings General page and in "Advanced section" please click on "Show advanced settings of JavaScript loading" link after this please be sure that this checkbox option: "Disable Bootstrap loading on Front-End" is UNCHECKED.
Here is 2 solutions.
A) Upload using FTP manager. It's can be any ftp manager for uploading files to your server. If you do not have FTP access, so then please contact support of your hosting. Also they can recommend to you FTP manager that can be good for your server to upload these files.
1) Please download the archive of the Booking Calendar to your desktop.
2) Extract it from archive. You have to get the "booking" folder.
3) Then upload this folder, using the FTP manager (like FAR or some other) to your server, to the folder
../wp-content/plugins/
4) Now open admin panel of your WordPress site. At Plugins menu, you have to see "Booking Calendar" plugin.
(If you was having previous free version, there, please deactivate it).
Click at the "Activate" link of your new paid version.
5) Please wait until message will show that the plugin is activated successfully. Now you can use the Booking Calendar plugin.
B) Or you can ask your serve administrator or support of hosting company to extend max file-size limit at your server.
Thank you.
This error can be at some servers of 1&1 hosting, or may be at some other ones.
For fixing this issue, please add this line to their .htaccess file:
AddType x-mapp-php5 .php
If you are using the booking calendar free version
Try to open the login dialog and retry the password. Then recheck what the email address is used in this email. If you will see the "Wordpress title", so then its somewhere in the settings of WordPress.
Try to open the wp_options table in your DB (using the phpMyAdmin tool or some other DB tool),
Find the option with name "admin_email" and recheck that the email for this field do not have the "WordPress" title.
If you are using the paid version of Booking Calendar, please check this:
Booking Calendar use the standard "WordPress" wp_mail function for sending of the emails, which possibly can be overridden by the other plugins or theme.
Firstly please open the Booking > Settings > Emails page and recheck that you correctly configured the emails in fields "From". that there was no any "WordPress titles". Test it.
Then please try to deactivate one by obe all other active plugins and test if its help or not, may be some other active plugin is override the wp_mail function and thats why you are having that "WordPress" title in the email template. try the same with theme.
For any versions:
Also please open your contact book at youe email account and try to delete that email contact, may be this contact already have the "WordPress" title saved in your contact book at your email account, and thats why you have that "WordPress" title in the emails.
The reason of this issue can be any JavaScript errors at your site. Probably some other active plugin or actual theme is generate some JavaScript error, because of that the calendar will not show up. You are need to fix this error(s).
Firstly try to find what plugin or may be theme is generate this issue.
- Try to deactivate one by one all actual plugins to check if the calendar will show up or not, to find what plugin is generate this issue.
- If the previous do not help, try to deactivate the actual theme and activate the default WordPress theme, then test it, if the reason of issue in the actual theme.
- If the previous steps do not help, and you can not solve the issue, please check the description of the JavaScript error, and send it with link to the page, where this issue is exist. so then we will try to help you.
Some other possible issues.
I am get this JavaScript error:
Error: a("body").on is not a function
Source: .../booking/interface/bs/js/bs.min.js
Line: 7
Solution:
Its seems, that this issue is because your theme is used the old version of jQuery.
Please, download the latest version of jQuery and integrate it into your actual theme or just use the latest version of jQuery from WordPress installation (just comment loading of the jQuery from the theme and the Booking calendar will add load of the jQuery from your wordpress installation (of course, recheck that this installation also have to be up to date)).
If you are get the JavaScript error similar to this:
Error: jQuery("#calendar_booking" + bk_type).datepick is not a function
Source: .../wp-content/plugins/booking/js/wpdev.bk.js
Line: 161
So then please check the troubleshooting instruction here.
Reason of issue.
This issue can appear, if you was using the old version of Booking Calendar (older than 4.1 version) and made update to the new WordPress version.
This issue was fixed since the update 4.1 of the Booking Calendar. You can check about that at the change-log here.
Solution.
You are need to update your version of Booking Calendar to the latest version.
If you are using the free version of Booking Calendar you can update your version in the WordPress > Plugins menu page.
If you are using the paid version of Booking Calendar you can request the new update at this page.
If you try to edit additional cost at the Booking > Resources > Advanced cost page and during saving, all your changes removed back to default values "100%", then please check these steps:
1) Please be sure, if you are using custom booking forms, that the length of custom booking form name not longer than 30 symbols. If its longer, then you need to recreate your custom booking forms.
For doing that, please open the Booking > Settings > Fields page. Select your custom booking form.
Then copy content of "booking form" and "content of booking fields data" form to some TXT file.
Click on "Delete" button in the toolbar to delete this custom form.
Then create new custom form, where name must be not longer than 30 symbols. Paste in the forms your saved data and save changes.
If you was inserting into the posts or pages, booking shortcodes with previous custom form, you need to reinsert them.
Now you can test it.
2) Please be sure that you do not use in the names and values of checkboxes and selectboxes in your booking form some non standard symbols, like umlauts, or % or ' ,etc...
That's why please open the Booking > Settings > Fields page and for the each booking form (if you are having several custom booking forms), please recheck (re-create) shortcodes by using only standard symbols in the names and values.
This issue is exist at the version 4.0 and 4.0.1 of the Booking Calendar.
For fixing this issue, please make this small modifications:
1) please open the ../booking/inc/payments/paypal.php file:
2) find this code:
update_bk_option( 'booking_paypal_return_url' , $_POST['paypal_return_url'] );
and replace it to this code:
update_bk_option( 'booking_paypal_return_url' ,    $_POST['paypal_return_url'] );
update_bk_option( 'booking_paypal_cancel_return_url' ,    $_POST['paypal_cancel_return_url'] );
I am activated the "Auto cancel bookings" feature (Cancel only pending, not paid bookings, which is older then at this selection), but its still not work even after specific amount of time after creation of bookings for the bookings, which are have no successful payment status and not approved. How to fix it ?
Its known issue in the versions 4.0 and 4.0.1 of the Booking Calendar.
So for fixing this issue, please open this file ../booking/inc/biz_s.php
find this function declaration:
function check_pending_not_paid_auto_cancell_bookings($bk_type)
inside of the content of that function, please find this code:
$labels_payment_status_ok = implode( ', ', $labels_payment_status_ok);
$labels_payment_status_pending = get_payment_status_pending();
$labels_payment_status_pending = implode( ', ', $labels_payment_status_pending);
$labels_payment_status_ok .= ', ' . $labels_payment_status_pending;
and replace it to this code:
$labels_payment_status_ok = implode( "', '" , $labels_payment_status_ok);
$labels_payment_status_ok = "'" . $labels_payment_status_ok;
$labels_payment_status_pending = get_payment_status_pending();
$labels_payment_status_pending = implode( "', '", $labels_payment_status_pending);
$labels_payment_status_ok .= "', '" . $labels_payment_status_pending . "'";
My Regular Users can see the bookings from other user(s) in MultiUser version, after reconfiguration parameters in filter tab. How to fix it ?
Its known issue in the versions 4.0 - 4.0.2 of the Booking Calendar.
For fixing this issue, please open file ../booking/inc/multiuser.php
find this code:
if (! isset($_REQUEST['wh_booking_type'])) {
and replace it to this code:
if ( (! isset($_REQUEST['wh_booking_type'])) || (empty($_REQUEST['wh_booking_type'])) ) {
Plugins
Gravity Forms [Tested in version 2.2.5, but this issue can exist in other versions of Gravity Forms]
Conflict paid versions of Booking Calendar with "Gravity Forms" plugin, if in "Gravity Forms" plugin was used "masked input" field(s).
Because of this conflict is generating JavaScript error and as reason of this, Gravity form is not showing and also calendar in Booking Calendar is not showing, as well.
Since update 8.1.1, Booking Calendar will not load masked input script for times fields, if was loaded masked input script in Gravity form. Its means that masked input for start/end times text fields, will be used as standard text inputs.
If you are using older versions of Booking Calendar, you can make this fix to resolve this issue.
Please open this file ../{Booking Calendar Folder}/inc/_ps/personal.php
( you can check how to edit files in WordPress menu in this article )
then find this code:
wp_enqueue_script( 'wpbc-meio-mask', WPBC_PLUGIN_URL . '/inc/js/jquery.meio.mask.min'.((WP_BK_MIN)?'.min':'').'.js', array( 'wpbc-global-vars' ), '1.0');
and replace it to this code (comment that line):
// wp_enqueue_script( 'wpbc-meio-mask', WPBC_PLUGIN_URL . '/inc/js/jquery.meio.mask.min'.((WP_BK_MIN)?'.min':'').'.js', array( 'wpbc-global-vars' ), '1.0');
advanced-custom-fields [Version 4.1.4]
So please deactivate this plugin, if you want to insert the booking shortcode into the post or page using the popup configuration dialog or you can insert the booking shortcode manually. Please read how manually to configure Booking Calendar shortcodes here
html5-jquery-audio-player [Version 2.1]
Fix:
Open file: ../html5-jquery-audio-player/index.php
Find this code:
wp_enqueue_script('jquery');
wp_deregister_script( 'hmp-jquery' );
wp_register_script( 'hmp-jquery', "https://ajax.googleapis.com/ajax/libs/jquery/1.7.2/jquery.min.js");
and replace it to this code:
//    wp_enqueue_script('jquery');
//    wp_deregister_script( 'hmp-jquery' );
//    wp_register_script( 'hmp-jquery', "https://ajax.googleapis.com/ajax/libs/jquery/1.7.2/jquery.min.js");
Comprehensive Google Map Plugin [Version 7.0.31]
This issue is fixed in the Booking Calendar since update 4.2.
For the older versions please check this fix.
Fix:
Open file: ../booking/lib/wpdev-booking-class.php
1) Find this code:
add_action( 'init', array(&$this,'add_custom_buttons') );
add_action( 'admin_head', array(&$this,'insert_wpdev_button'));
and replace it to this code:
add_action( 'init', array(&$this,'add_custom_buttons') );
add_action( 'admin_head', array(&$this,'insert_wpdev_button'));
// Remove the scripts, which generated conflicts
add_action('admin_init', array(&$this, 'wpdevbk_remove_conflict_scripts'), 999);
2) Then find this code:
// add hook for printing scripts only at this plugin page
function on_add_admin_js_files() {
and replace it to this code:
// Deregister scripts, which  is generate conflicts - only at the Booking Admin  menu pages
function wpdevbk_remove_conflict_scripts(){
if (strpos($_SERVER['REQUEST_URI'], 'wpdev-booking.phpwpdev-booking') !== false) {
wp_dequeue_script( 'cgmp-jquery-tools-tooltip' );
}
}
// add hook for printing scripts only at this plugin page
function on_add_admin_js_files() {
Themes
Other questions relative to Booking Calendar
No, you do not need to make update from WordPress directory, because then you will use Booking Calendar Free version.
We will send to you update(s) of your Booking Calendar version (if these update(s) are ready) by email directly, after you are request update at this page.
You can check according new updates at this page.
The update 4.0 of Booking Calendar have a new names of the versions.
The Booking Calendar Standard become Booking Calendar Free,
Booking Calendar Professional -> Booking Calendar Personal,
Booking Calendar Premium -> Booking Calendar Business Small,
Booking Calendar Premium Plus -> Booking Calendar Business Medium,
Booking Calendar Hotel Edition -> Booking Calendar Business Large,
Booking Calendar MultiUser -> Booking Calendar MultiUser.
Good news! If you was purchasing your version of Booking Calendar in this terms from 15/12/2013 until 15/12/2014,
then we extend period of ability request free updates of your version of Booking Calendar to additional 6 months.
It means that, if you purchased your version of Booking Calendar on 15/12/2013, then you can request free updates of your version until 15/06/2015. If you purchased your version of Booking Calendar on 15/12/2014, then you can request free updates of your version until 15/06/2016. Etc... You can request the new update of Booking Calendar on this page.
All customers who was purchased Booking Calendar single site usage version until 15/12/2014, automatically switching to the same "developer edition" version, which possible to use on 2 websites - live and test.
1. Where all bookings details are saved?
Please note, Booking Calendar plugin saving all booking details at the your WordPress database at your server(s). Its does not transfer your booking details to our servers and does not store such info about booking details at our server(s).
Here is list of all database tables of Booking Calendar that is storing info about the booking details:
wp_booking
wp_bookingdates
wp_bookingtypes    (available in paid versions)
wp_booking_coupons (available in  Booking Calendar Business Large or higher version)
wp_booking_seasons (available in  Booking Calendar Business Medium or higher versions )
wp_booking_types_meta (available in  Booking Calendar Business Medium or higher versions )
Some info is saving into the wp_options table, but such records relative only to settings, and not the booking details.
2. Additional steps
Its means that your organization need to check and audit your website and booking details, what you store about bookings and apply additional steps to be compliant with GDPR data laws or some other data protection or saving laws. Its your obligatory to be complaint with any law that apply to you depend from your country or saving data.
To be compliant with GDPR data laws you need to check info about this law, because its about what data you are saving during booking process, how your visitor can access this data and how to erase this data, etc...
Check useful link here: http://www.wired.co.uk/article/what-is-gdpr-uk-eu-legislation-compliance-summary-fines-2018
And check this 12 steps prepare guide for General
Data Protection Regulation https://ico.org.uk/media/for-organisations/documents/1624219/preparing-for-the-gdpr-12-steps.pdf
Probably you will be need to check some additional relative info.
The primary details, of what exactly fields about persons you are saving you can check at the Booking > Settings > Form page. Basically its your booking form fields.
3. Adding required checkbox to the booking form, to accept your terms
You can add the "required checkbox" to your booking form at the Booking > Settings > Form page, to accept your terms and conditions and your privacy policy. Its supporting in all versions of Booking Calendar (including Booking Calendar Free version).
Watch this video guide about editing booking form fields in the paid versions of Booking Calendar.
4. List all past bookings and cancel specific bookings (available in paid versions)
In the paid versions of Booking Calendar you can use the ability to list all past bookings of user. So visitor who made the booking, can view all own past bookings (in timeline view, similar to this this example, but relative only to specific visitor).
Also visitor can cancel (move them to trash - its means that you still will require to make complete deleting of them (bookings from trash) at the Booking Listing page, after this request) own pending bookings. Please watch more about this in this video guide.